

The net requirements form in Dynamics 365 Finance and Operations is essential to understanding the master planning output and determining where to take action. The net requirements form is a snapshot of a single that item that tells a story of the various receipts and issues, when those receipts and issues are occurring, and when they should occur, and why a planned order was created in the first place. It also gives you a snapshot of what your inventory will look for a given item during a specific time period.
Often looking at planned orders alone will not give you the information you need to understand what is happening and what action you need to take. Usually you need to drill into the item requirements for specific items to understand the whole picture that MRP has painted.
In this article I will explain the net requirements form from top to bottom, so you are able to read and understand the data you are seeing in the form. At first the net requirements form is intimidating just because of the amount of data on the form but it is actually a very clear and useful form if you know how to read it.
Setup
Before we get into the form, I am going to show you what I have set up for this example so the data you see will make sense.
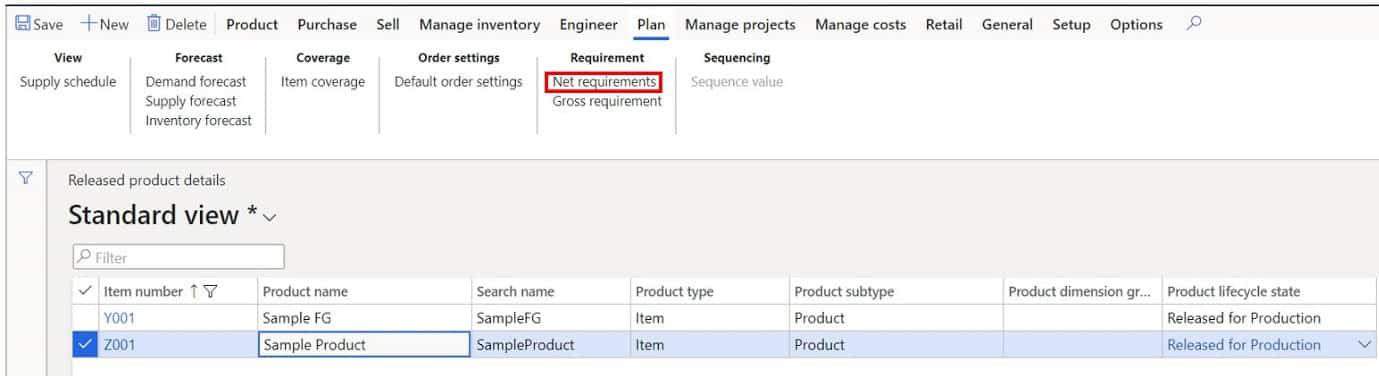
- First navigate to Product information management > Products > Released products.
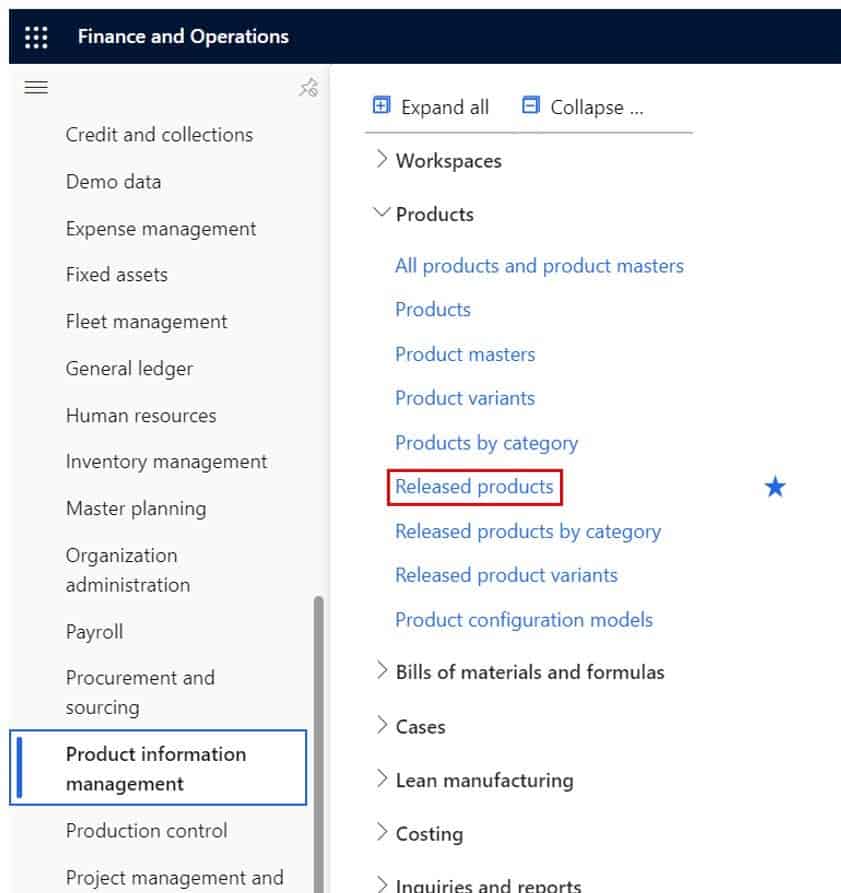
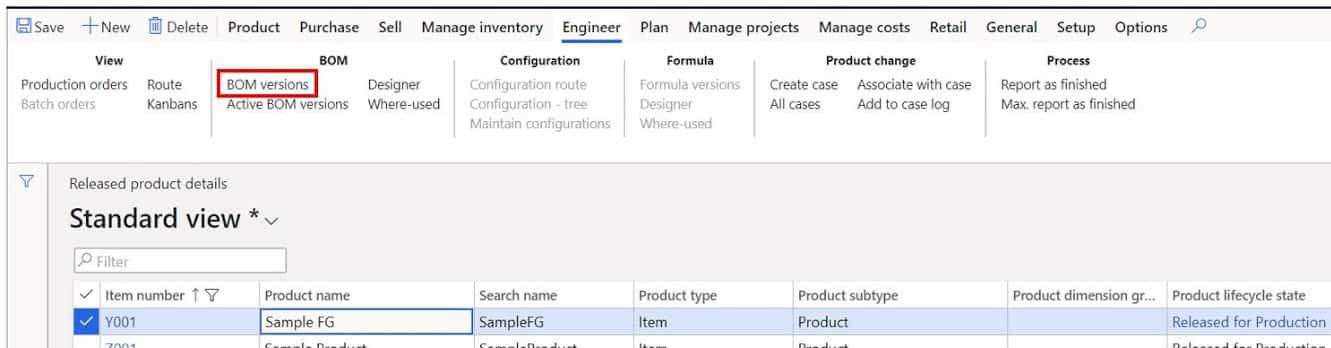
Here I have two products, “Y001” and “Z001”. “Y001” is a finished good manufactured item and “Z001” is a purchased component of “Y001”. If we go into the bill of materials, you can see that one “Z001” is needed to make one “Y001”.
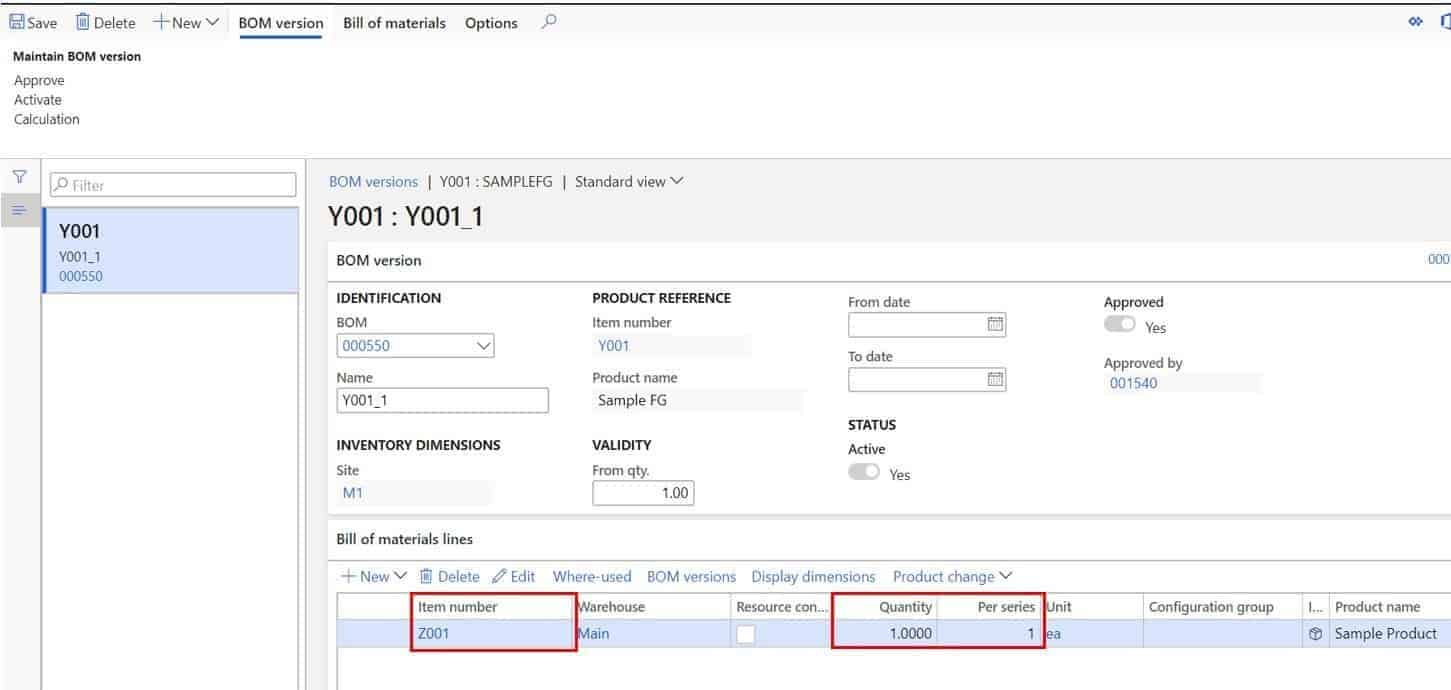
I have also added some lead time to purchase the “Z001” item and some manufacture lead time to “Y001” to give us some more meaningful results.
Run Master Planning
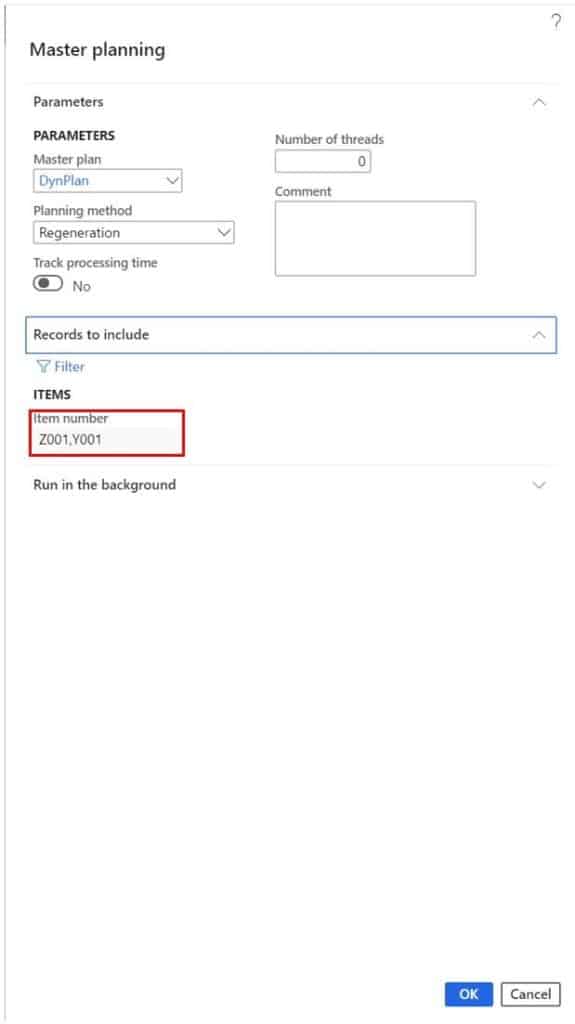
The next step is to run master planning. The net requirements form shows us the master planning results for a specific item.
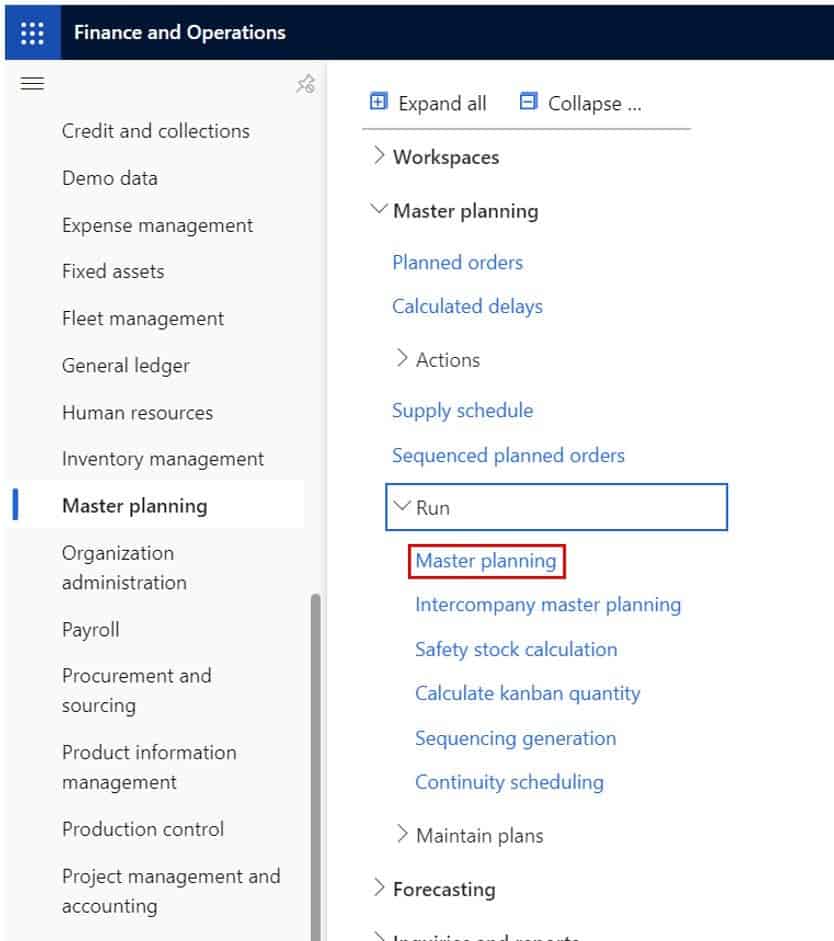
- To run master planning navigate to Master planning > Master planning > Run > Master planning.
Next I will filter master planning to only run for my two items and then run the job.
Now we can navigate back to our released products, click the “Plan” tab in the ribbon and click “Net requirements”.
Net Requirements Form
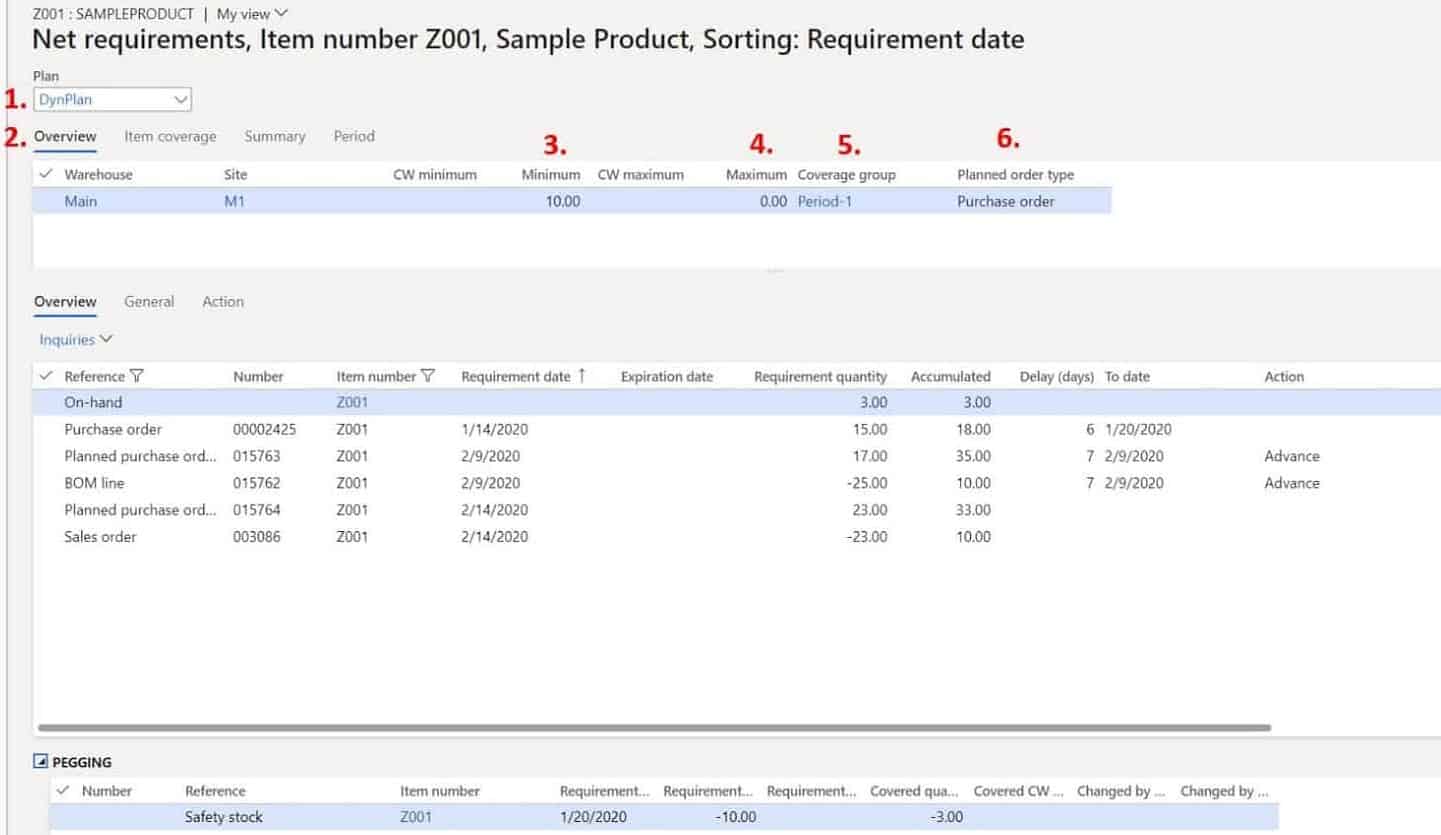
- At the top of the net requirements form you see the “Plan” field. If you are running multiple master plans you can switch back and forth between different plans to see the difference between each plan.
- The “Overview” tab of the top pane shows you the item requirements for the selected set of item coverage dimensions. In this case I am only planning for one site and one warehouse, but you could have multiple warehouses in which case you would have multiple record here. The selected record in this section will affect what you see in the two panes below.
- The “Minimum” field shows you your reorder point. Going below this point will trigger a safety stock requirement for which master planning will attempt to fulfill. In this case my reorder point is 10 so, when my inventory drops below 10 master planning will have a safety stock requirement to try to get me back up to 10. Also Master planning will try to keep my inventory at a quantity of 10 at all times.
- The “Maximum” field is only enabled when you are using a coverage group with a coverage code of type “Min/max”. Let’s say I had a minimum of 10 and a maximum of 20. As soon as master planning sees that I fall below 10 it will try to get me back up to quantity of 20.
- The “Coverage group” identifies the coverage group that was used to plan for that specific set of coverage dimensions.
- The “Planned order type” indicates what type of planned order should be created to fulfil requirements identified by master planning. In this case I set item “Z001” to be a purchase item.
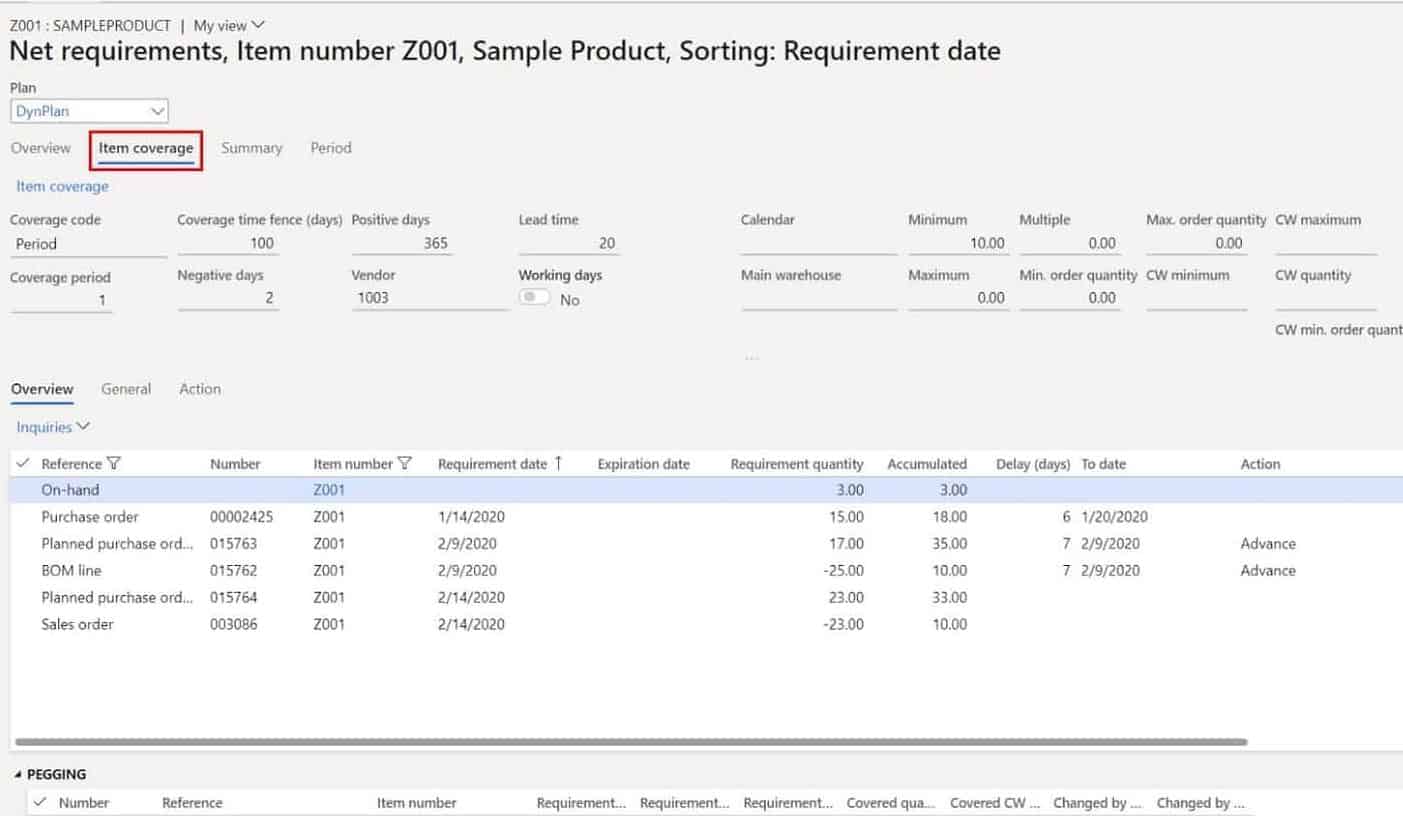
In the “Item coverage” tab gives us information about the coverage parameters that were used to calculate the results that we see in the net requirements form. As you can see, we have things like our coverage time fence, our default vendor, the purchase lead time, and much more. All these details are what master planning used to come up with the results you see in the form. If you are not getting the results you are expecting you can click the “Item coverage” tab and quickly see what the planner parameters were.
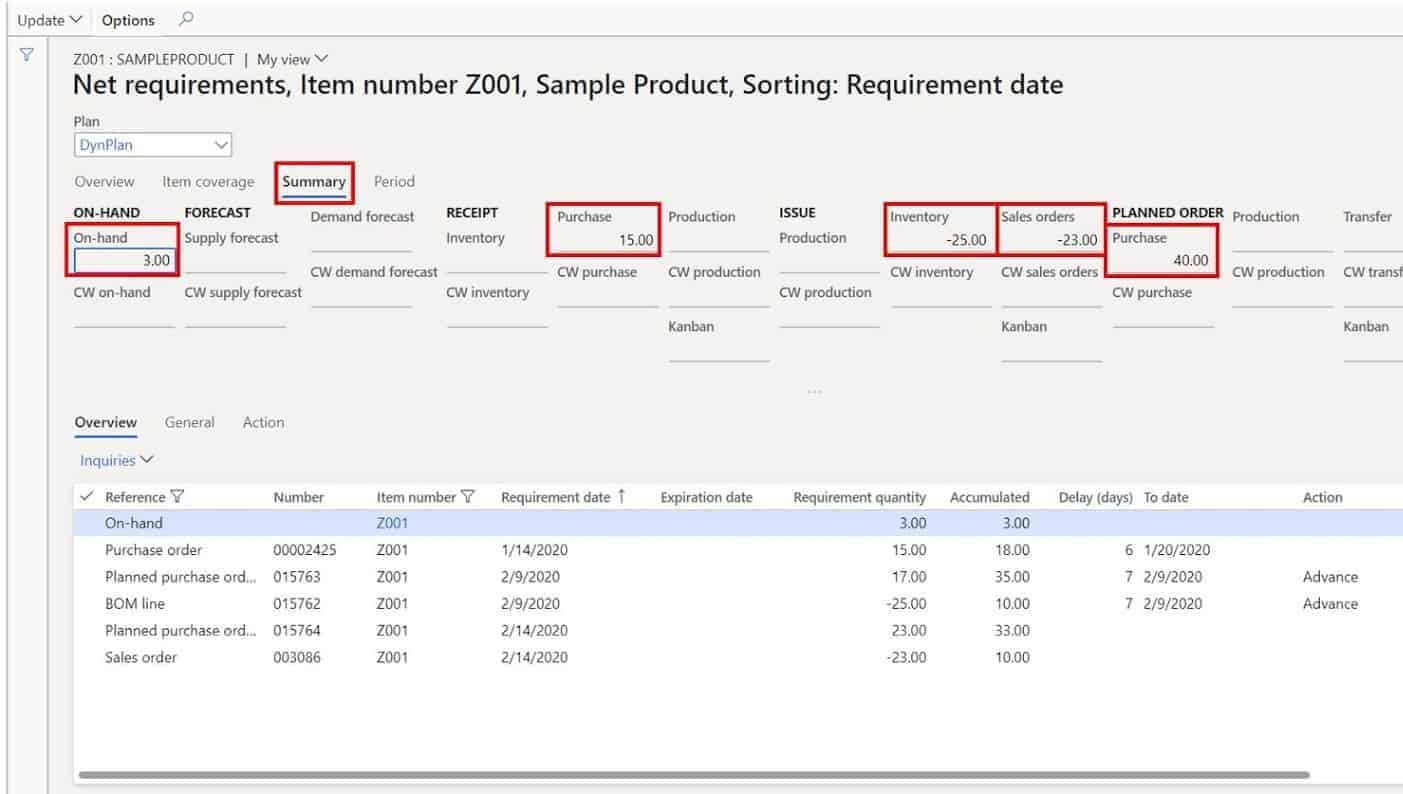
The “Summary” tab gives you totals for different planning categories. For example, we see:
- Total quantity on hand – 3
- Total quantity of existing firm purchase orders – 15
- Inventory, which is just the total component consumption in this case – 25
- Total issues from sales orders – 23
- Total from planned purchase orders – 40
The “Period” tab gives us inventory snapshot of total issues and receipts by a predefined period. For example, the one I have selected is in months so we can see in the month of February that we are getting a total of 40 receipts (17 + 23), 48 total issues (-23 + – 25), and the delta or net change is -8. It also shows us that we expect to have a total of 10 available for the month of February.
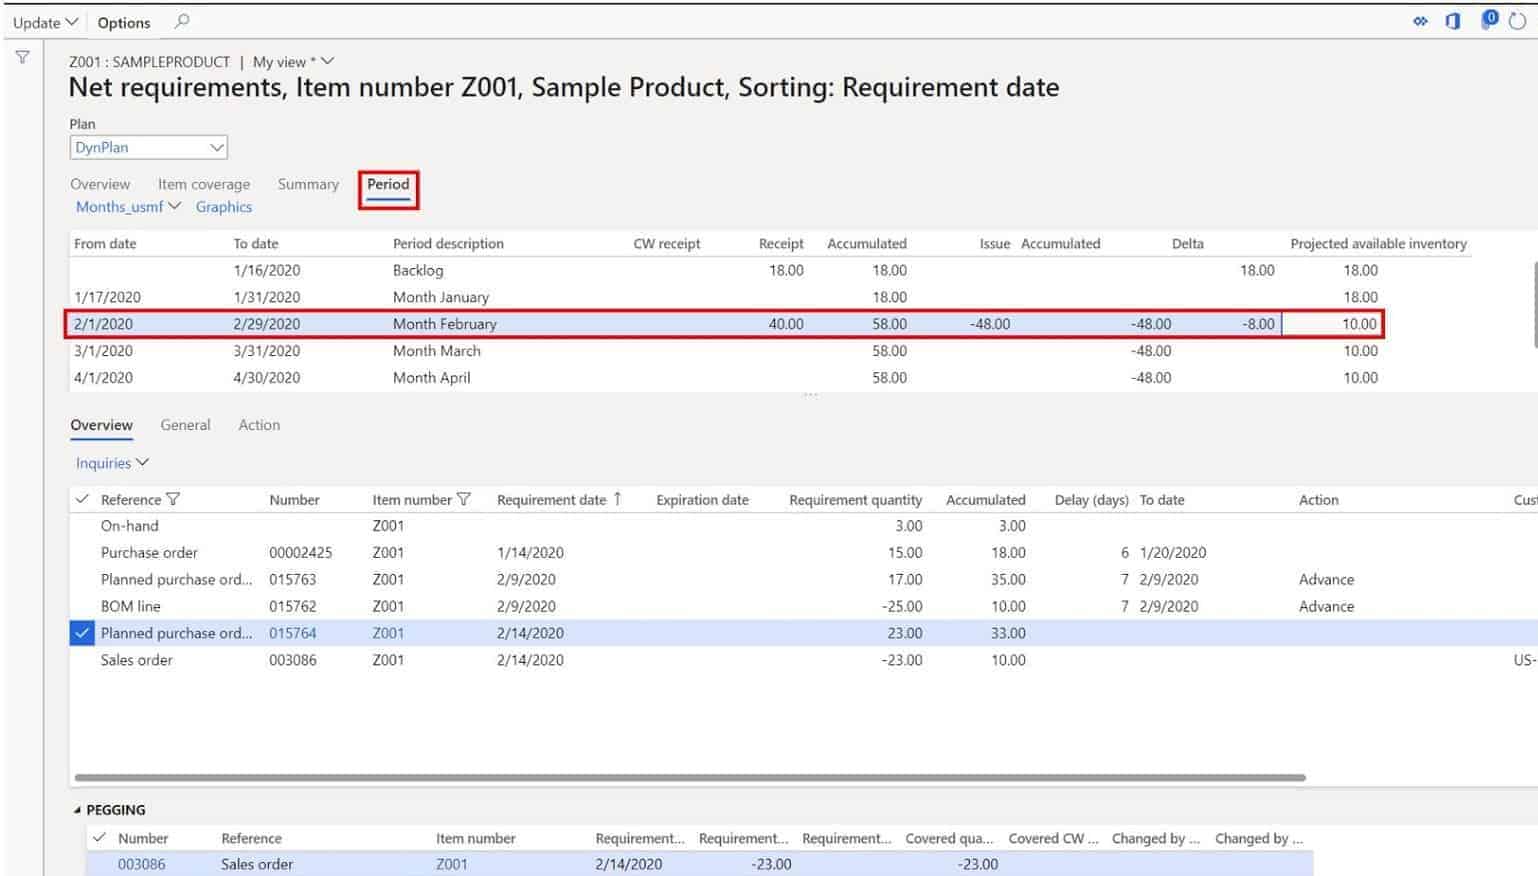
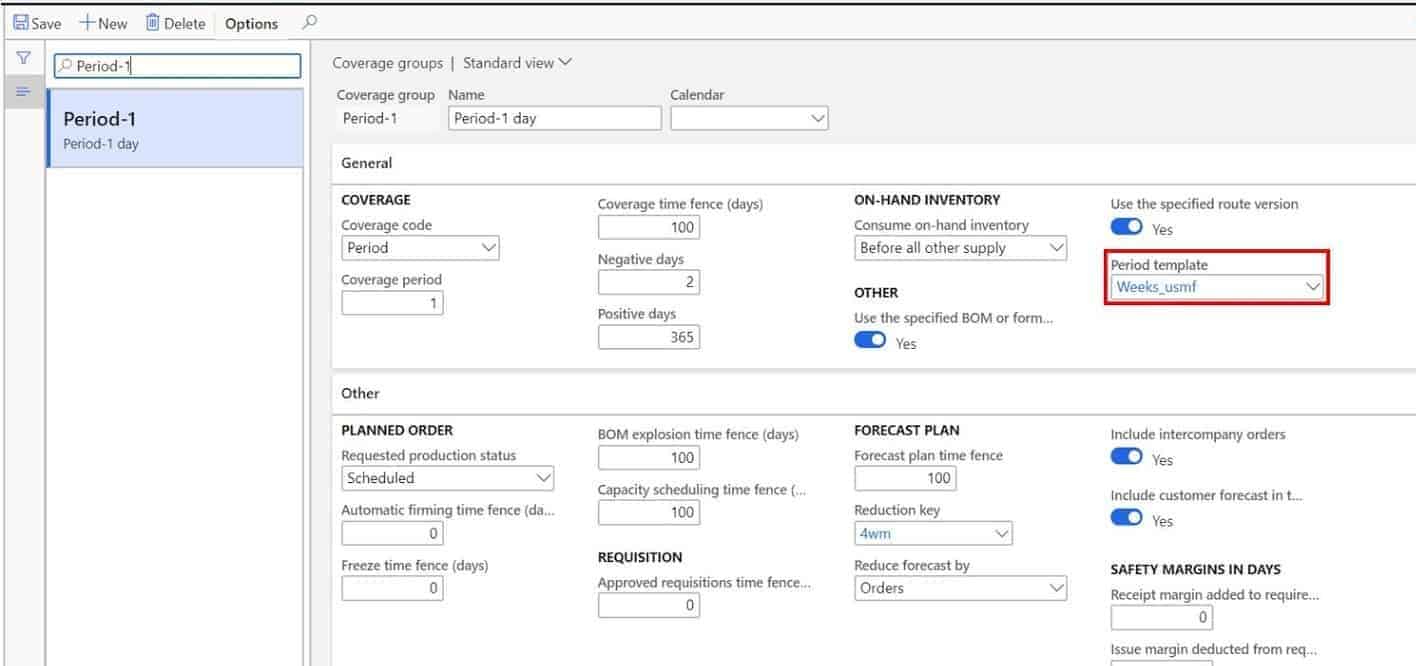
The period can be defaulted at the item coverage group form.
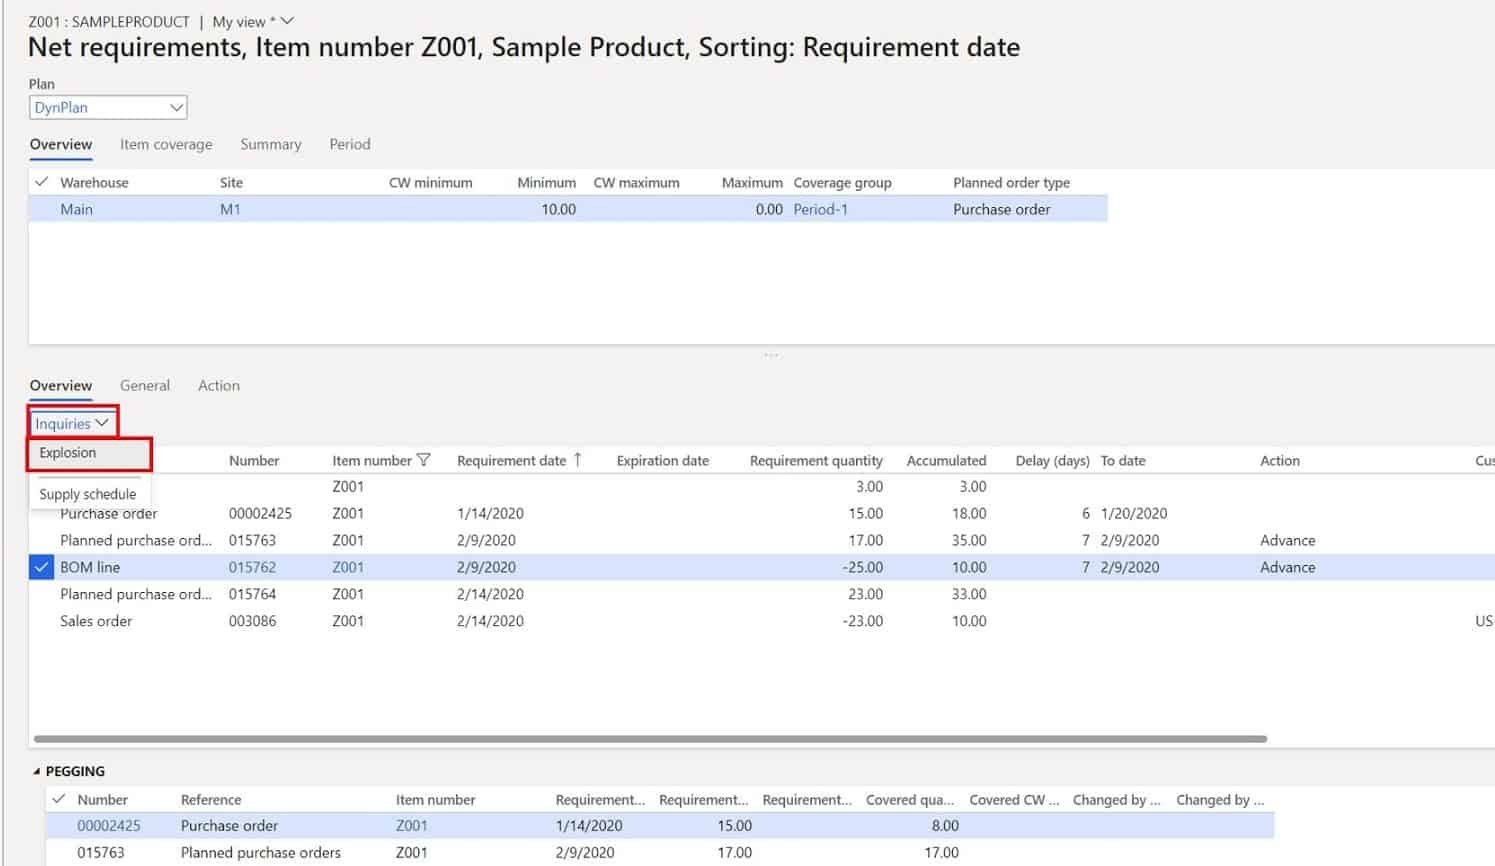
Next let’s move on to the middle pane which I will refer to as the “Requirements” pane and the bottom pane which I will refer to as the “Pegging” pane. Typically, the pegging pane is not expanded and is hard to see if you do not know it’s there so go ahead and expand that pane.
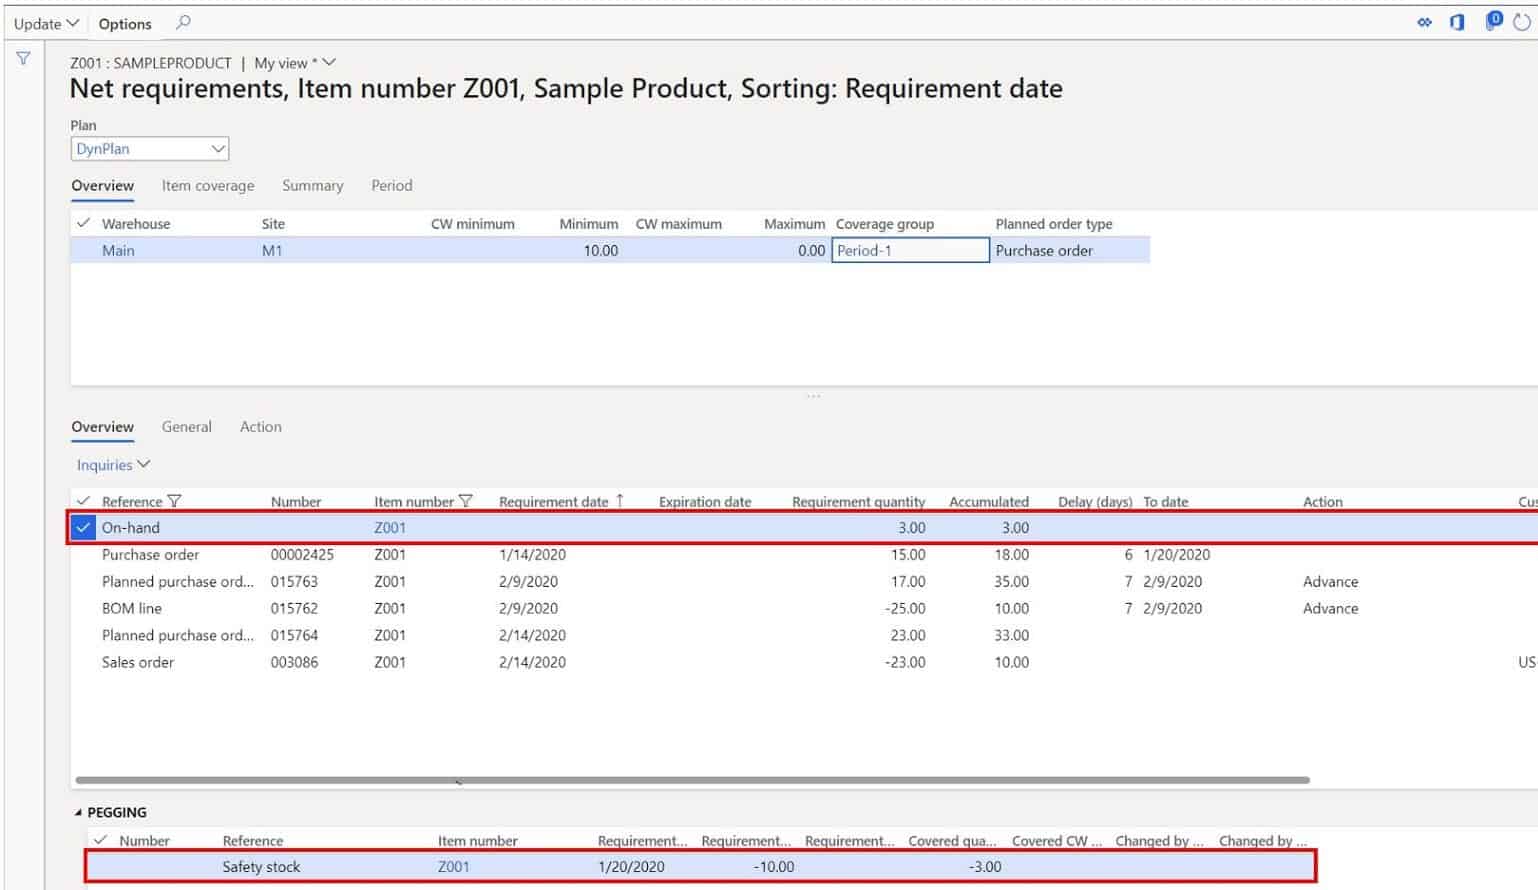
The first thing to notice is that the requirements are sorted from oldest to newest, the oldest being the on-hand record. The core purpose of master planning is matching up demand with supply, issues with receipts. This process of “matching up” is called pegging.
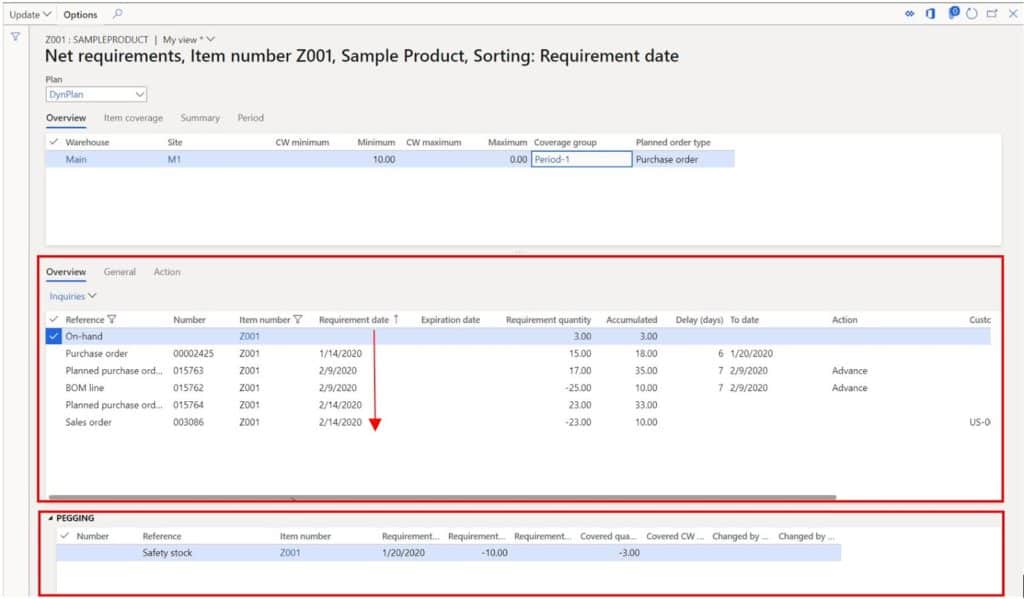
Master planning treats on hand inventory like receipt. If we just looked at the requirements pane, we would not be able to discern what demand master planning has pegged to our existing on hand inventory.
If we click on the on hand inventory record in the “Pegging” pane below we are now able to see that the on hand inventory has been pegged with safety stock. We have a safety stock requirement because my inventory is below my minimum of 10. You can also see that on hand inventory has only covered 3 of the 10 requirements so we will need something else to cover the remaining 7.
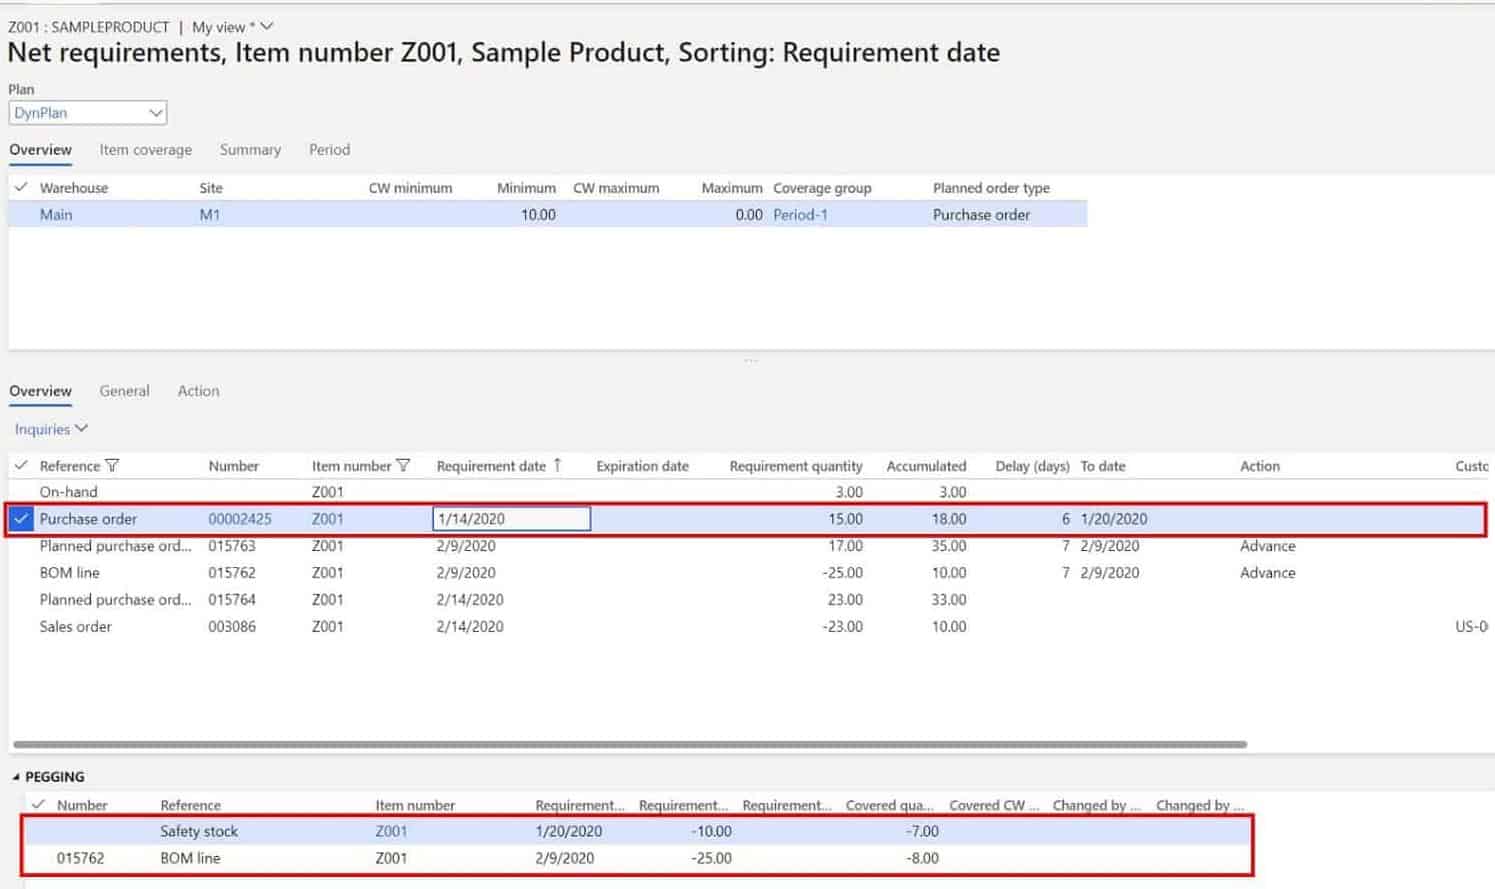
If we move down to the next line you can see that we have a purchase order for a quantity of 15 which is already existing. The way we know the purchase order is already existing and firm is by looking at the reference column. A “planned purchase order” can only be turned into an actual purchase order after the firming process and a “Purchase order” means it is an existing purchase order.
Now if we click on the purchase order record, we can see down in the pegging section that quantity of 7 of the 15 will fulfill the remaining 7 of the safety stock. Then the remaining 8 will be used to cover a requirement for “Z001” to be used as a component on a production order for “Y001”. But the production order for “Y001” is for quantity of 25 so we have a 17 that we still need. Let’s move to the next line to see what master planning has for us.
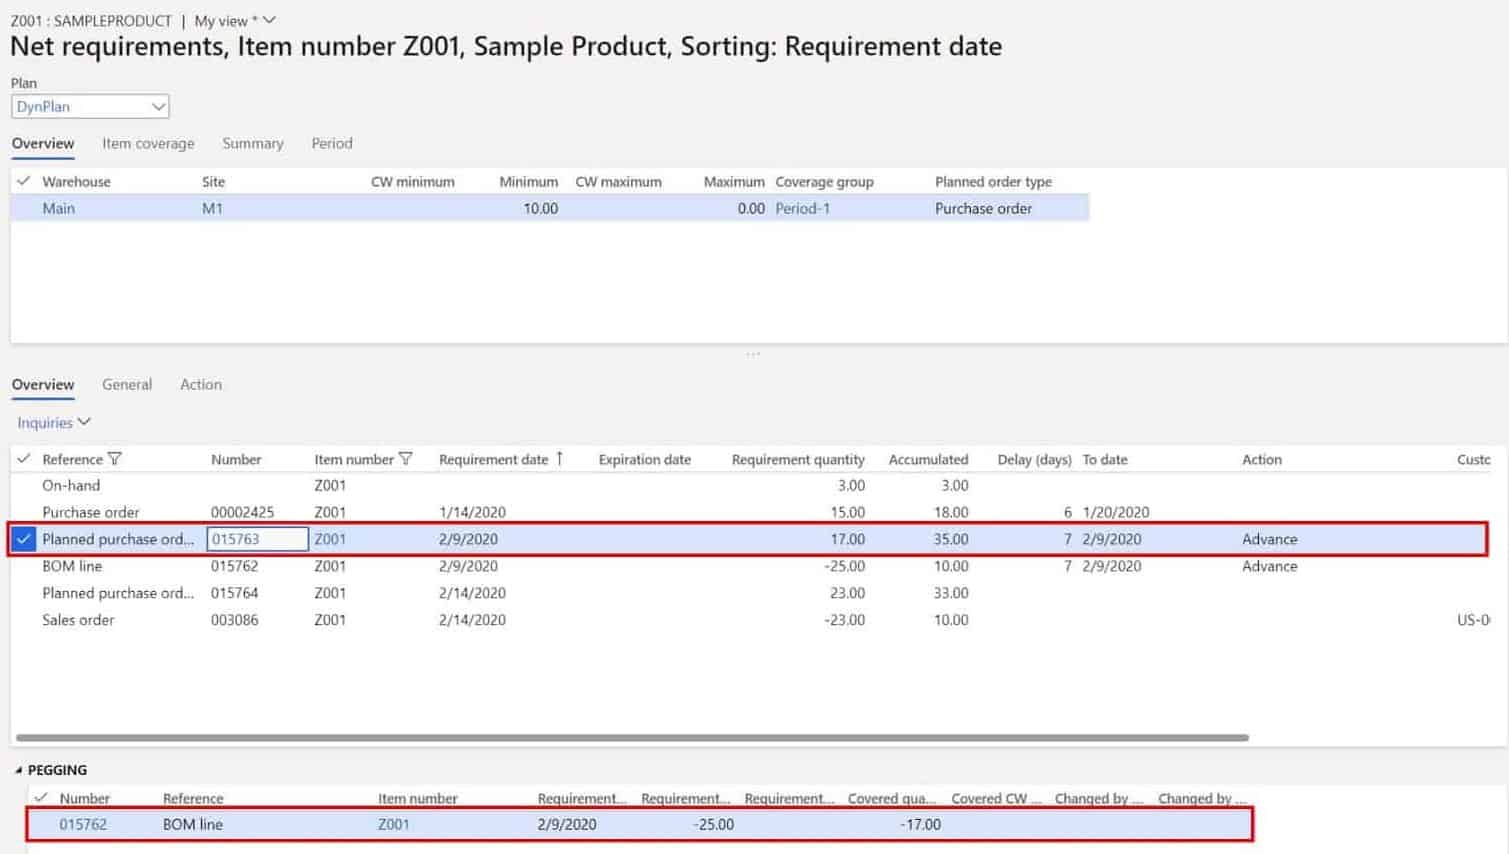
On the next line we have a planned purchase order for 17 and if we look down at the pegging section, we see the total quantity is pegged to the production order which will completely satisfy the total requirement of 25.
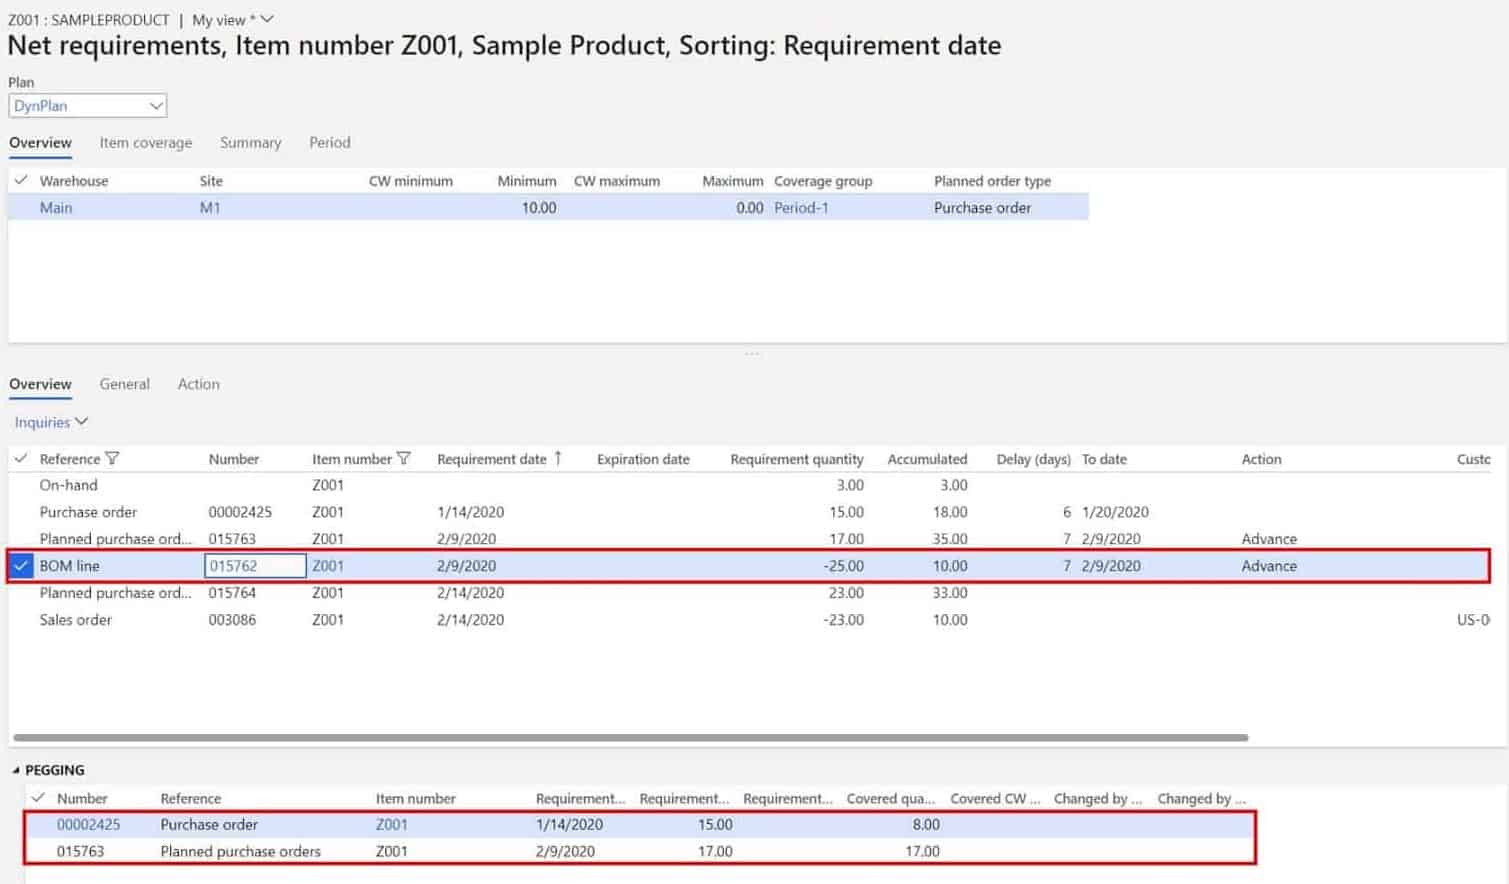
On the next line we have a “BOM line” requirement. This means that our item “Z001” is needed on a production order. We can see in the requirement quantity that this is an issue because we have a negative quantity for 25. If we look in the pegging section, you can also see what we just leaned earlier that this requirement is being fulfilled by an existing purchase order of 15 and a planned purchase order of 17.
We can also use a function called “Explosion” to see what the source of the demand is that is driving the requirement. Click on the BOM line requirement and click the “Inquiries” button and click the “Explosion” button.
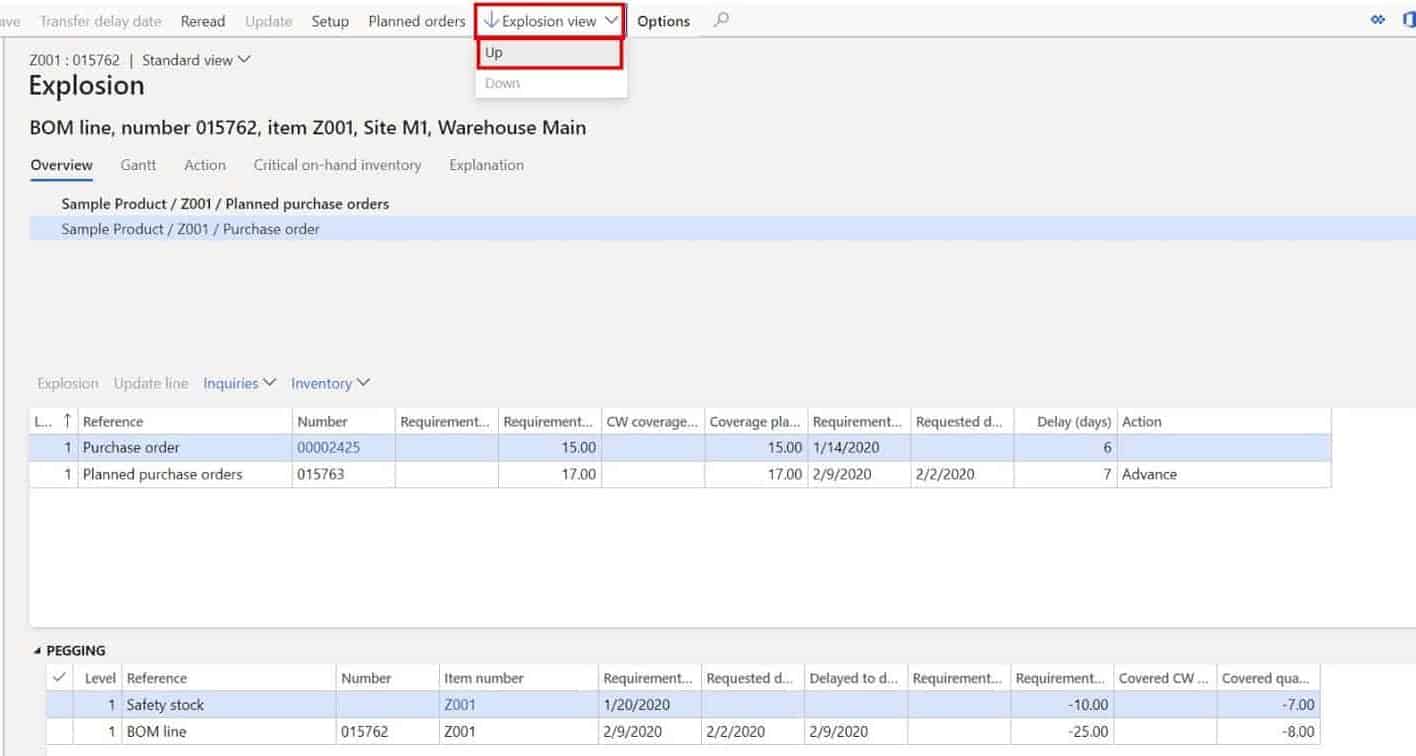
At the top of the form click the “Explosion view” button and click the “Up” option.
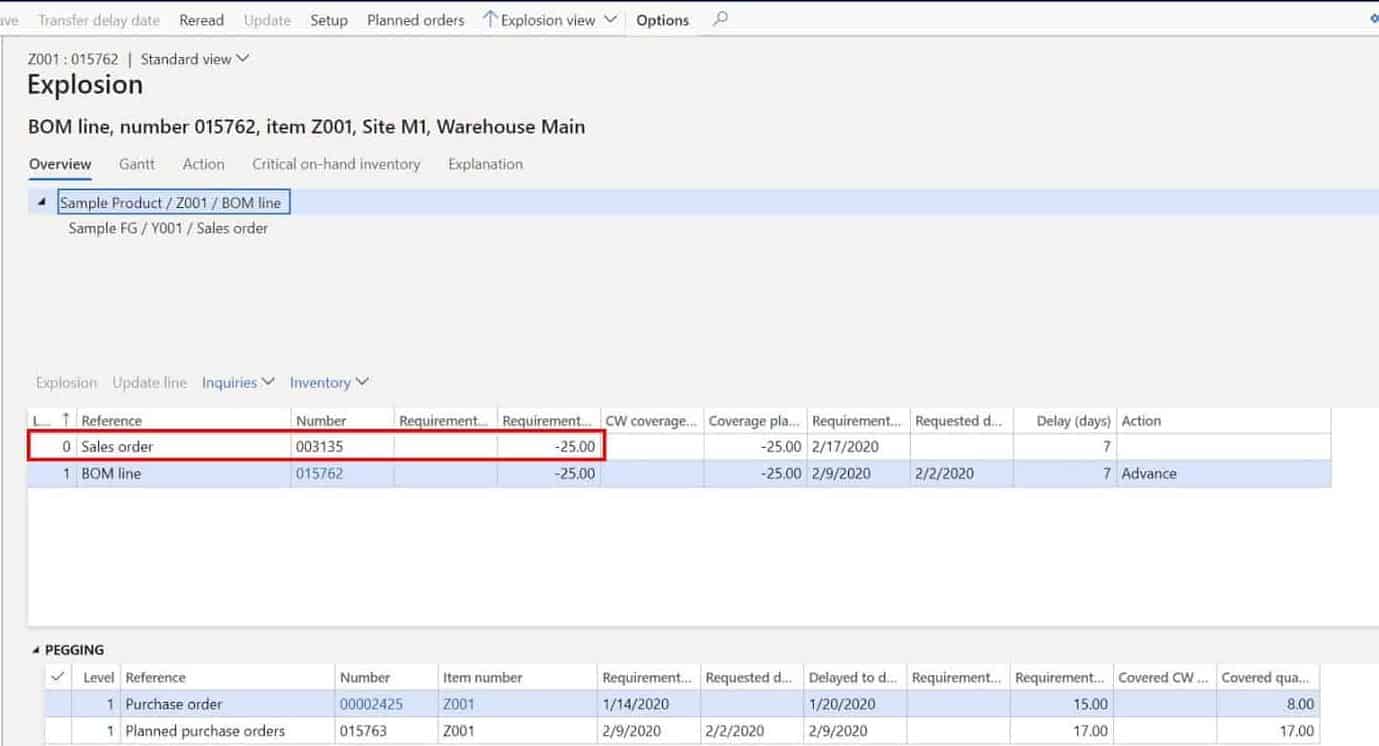
This view shows you that a sales order for quantity of 25 for item “Y001” is what is driving the demand. Form this sales order master planning created a planned production order for “Y001” which calls for “Z001”.
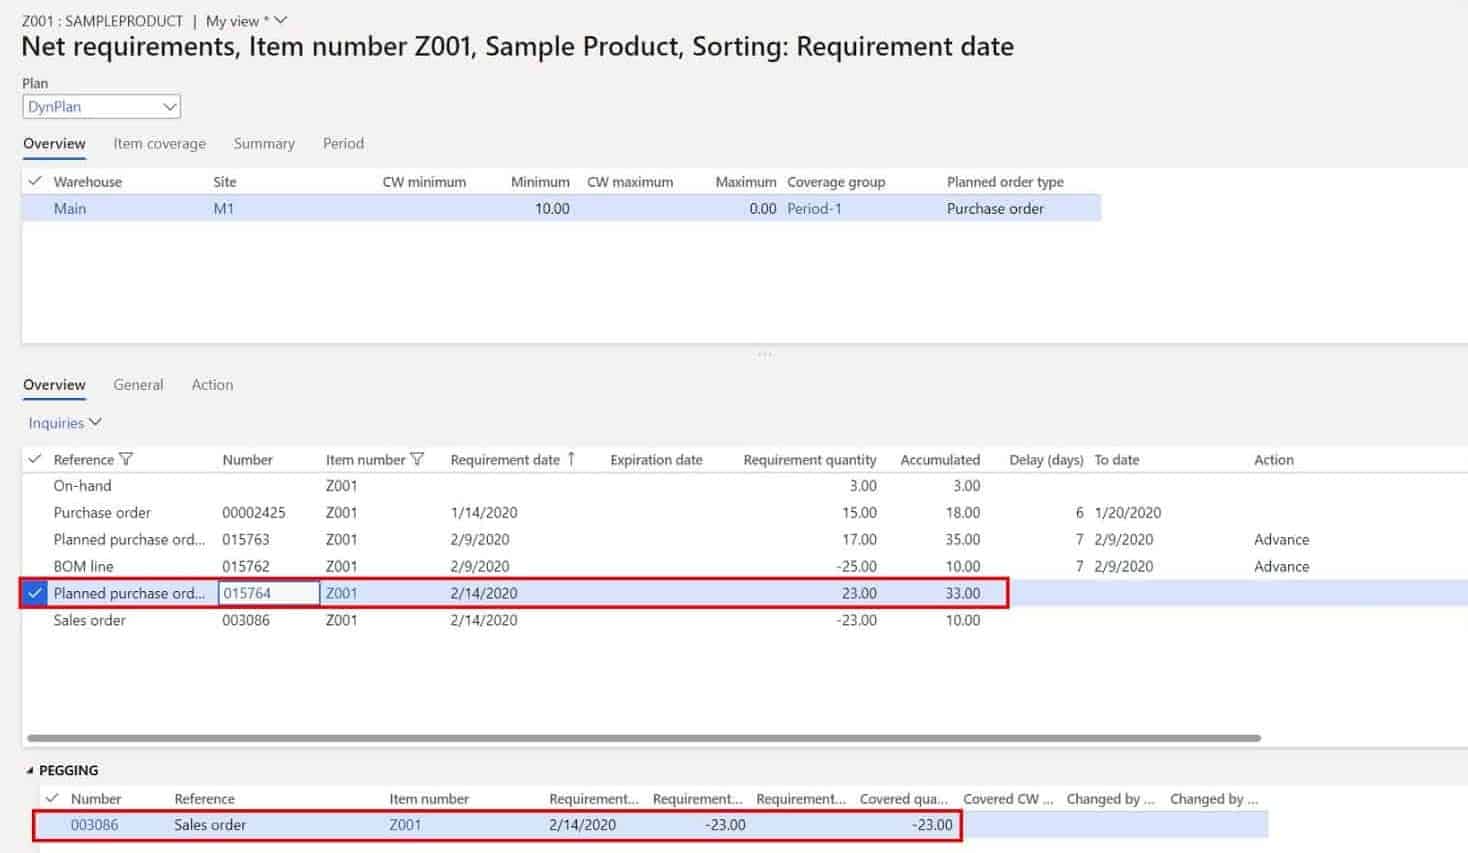
Back on the next line is a planned purchase order for 23 which is pegged to a sales order for item “Z001” for quantity of 23.
Now that you understand how the how the requirements section and the pegging section work together let’s look at some of the most important fields on the form and explain what they mean.
- Requirement date – This is the date that the issue or receipt will occur.
- Expiration date – If you are using batch numbers and using FEFO (first expiry first out) in you master planning you will see expiration dates. Master planning will also take expiring dates into account when pegging demand with supply.
- Requirement quantity – This is the total quantity required or total quantity supplied by the requirement record. As you have seen requirement quantities can be fulfilled across multiple requirements. Keep in mind this is not necessarily the original request date. I currently have the system configured to override the requirement date with the delayed date so that master planning comes up with a feasible plan based on all calculated delays. The original requested date is a field you can personalize on the grid if you need to see it.
- Accumulated – This is a running total of the accumulated quantity at that point in time. This shows you where you will have inventory shortages.
- Delay – This shows you how many days the requirement is delayed. For example, my purchase order was supposed to be delivered on 1/14/2020. I ran master planning at the end of the day on 1/17/2020 and master planning calculated that since I am not allowing receipts on my calendar over weekends the earliest we could expect it would be on Monday 1/20/2020 which would be the purchase order receipt was delayed 6 days from the original requirement date.
- To date – The is tells you what the delayed date will be.
- Action – If you have enabled action messages master planning may suggest that you take certain actions to mitigate delays and shortages. Keep in mind that the actions master planning suggests may not all be feasible in cases where lead times cannot be expedited.
Takeaways
The key to understanding master planning is understanding the net requirements form. If you can understand the picture master planning is trying to paint you can take much more decisive and accurate action to ensure you have a smooth and efficient supply chain. I hope this explanation of the net requirements form has been informative and comprehensive. If I have missed anything or you would like me to cover another related topic, please suggest a topic in the at the bottom of the home page or the all articles page.