

Location directives and work templates are arguably the most intimidating and complex setups in Dynamics 365 Finance and Operations, and they are the brains behind the entire advanced warehouse management (WMS) functionality. It took me many hours to figure out through trial, error, and testing the knowledge I’m about to share in this article.
In this article I will show you how work templates and locations directives work together to generate the pick and put work steps for various warehouse processes that are then completed using the warehouse mobile app. We will look at the most important setups and touchpoints of each and where the most common mistakes are made.
Work Templates
Work templates are how we define the steps we want the warehouse mobile application user to take when work gets generated from the work template. In most cases with simple processes, the work template will consist of a “Pick” and a “Put” step.
This means that when work is generated from the work template the system will create a pick and a put for the user to perform. At this point however the system would not know where to pick from or where to put to, that is defined in the location directives setup which we will see later in the article. In this example we will create a work template for sales order picking.
Create A Work Template
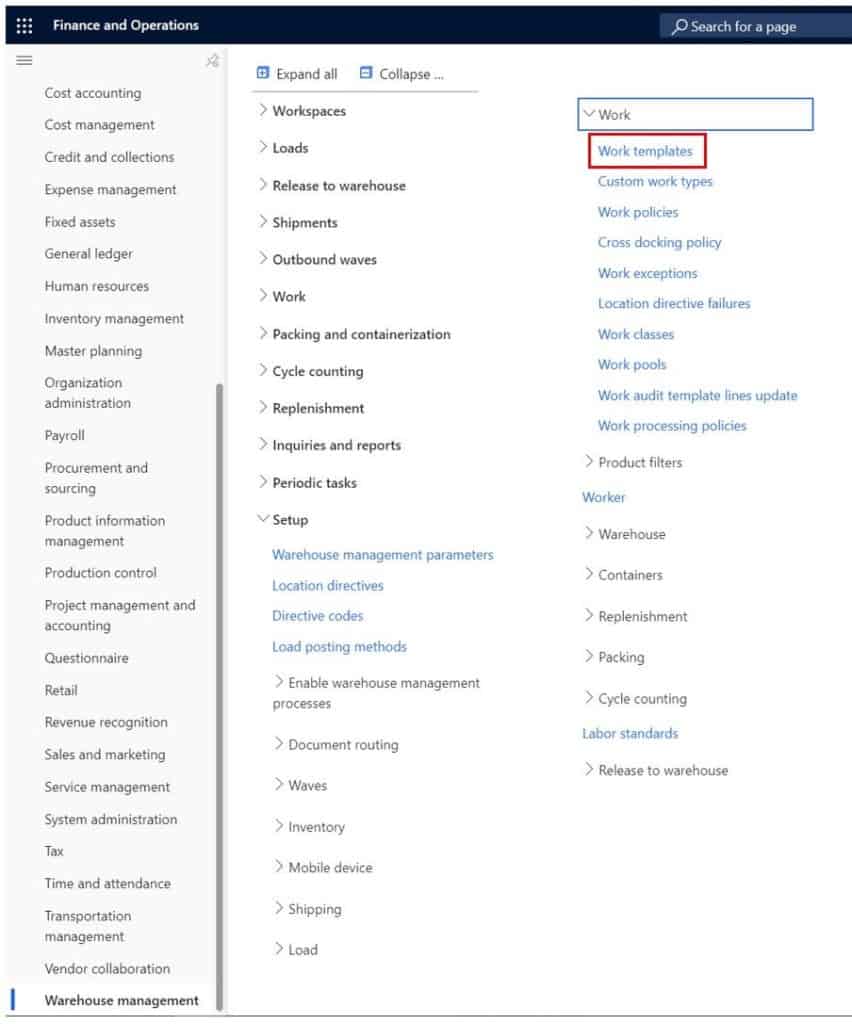
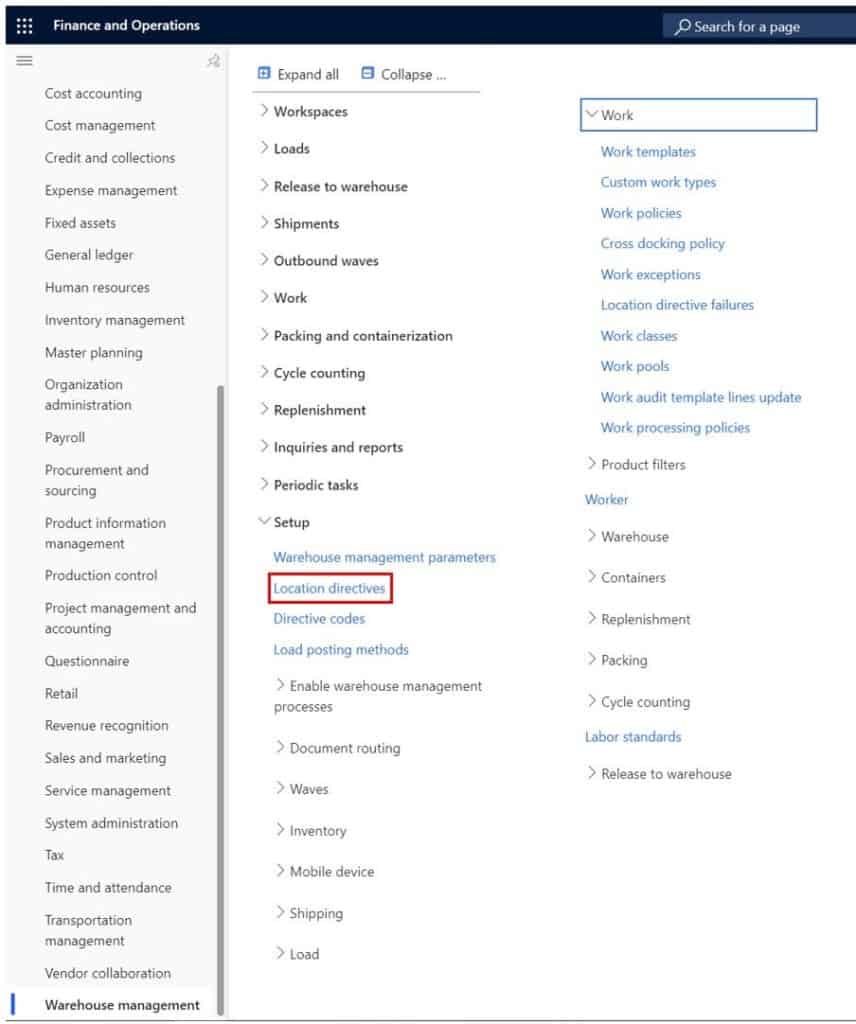
To create a work template, navigate to Warehouse management > Setup > Work > Work template.
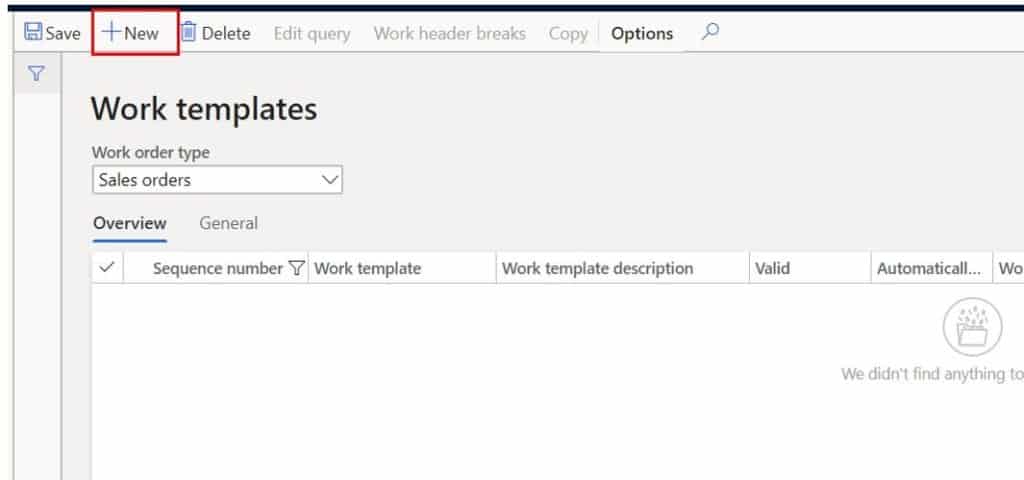
- Click the “New” button to create a new work template.
- Give the work template a name.
- Click the “Save” button. You will get a warning message that is telling you the work template is invalid. This is because every work template must contain a pick and a put pair for it to be valid (except for some special work templates like cycle count).
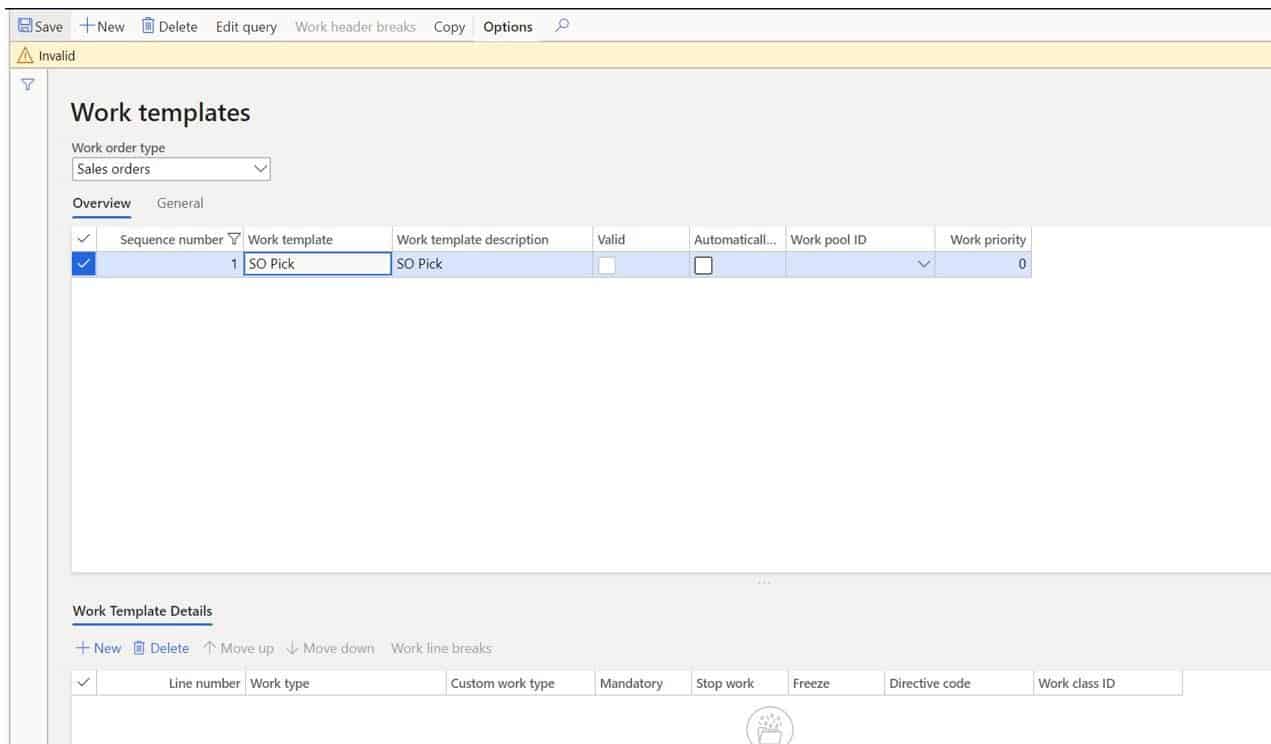
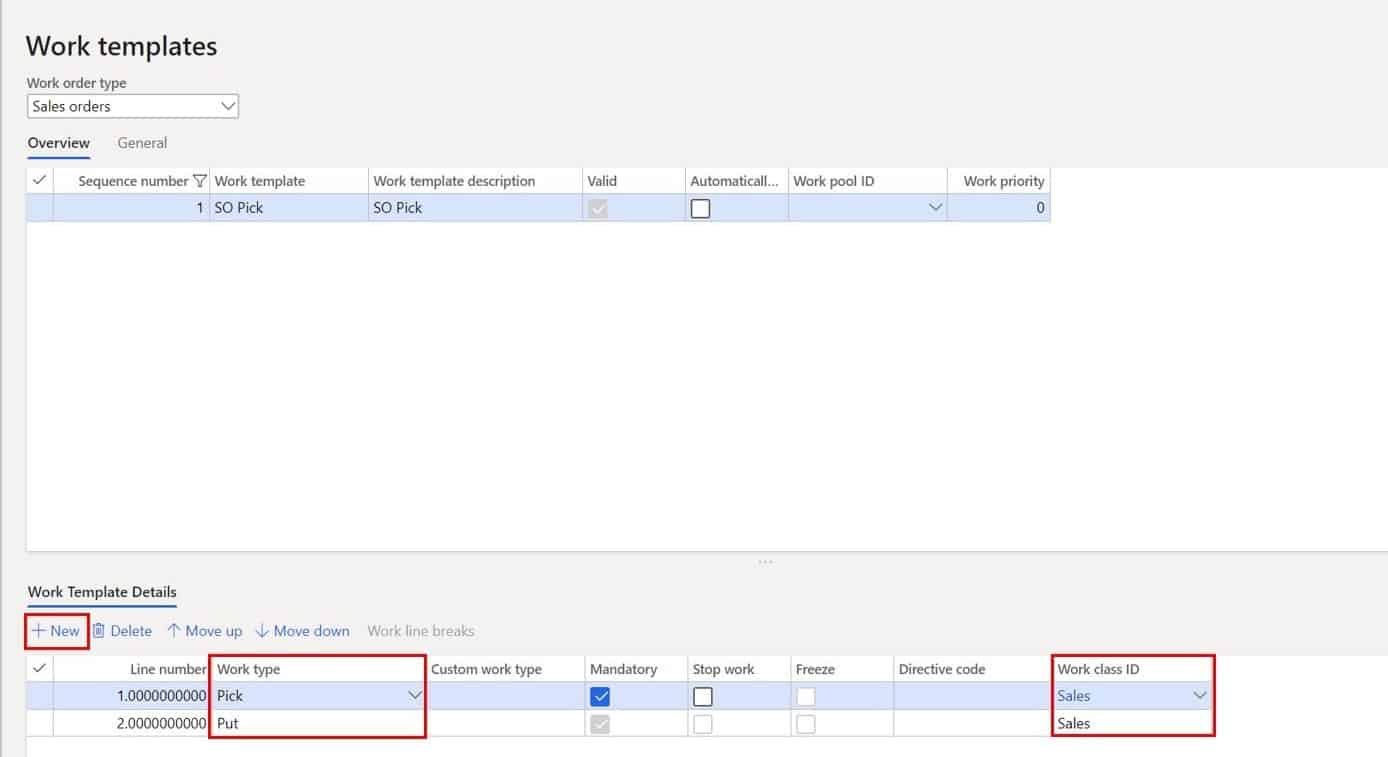
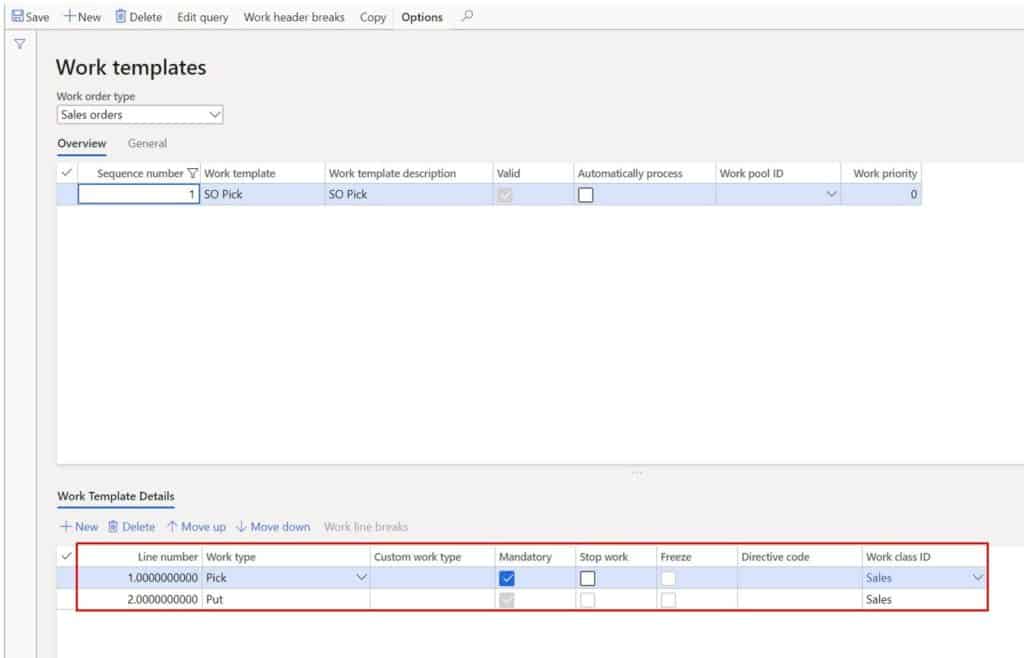
- Next, in the lower pane click the “New” button to create a work template line. For the first line select “Pick” as the “Work type”.
- Select a “Work class” for the work template line. The “Work class” is what ties the work to a specific mobile application menu item. So, if I created a sales picking menu item, I would select the “Sales” work class on the mobile application which would tie any work created from this template to be completed under that menu item (for the same work type of course).
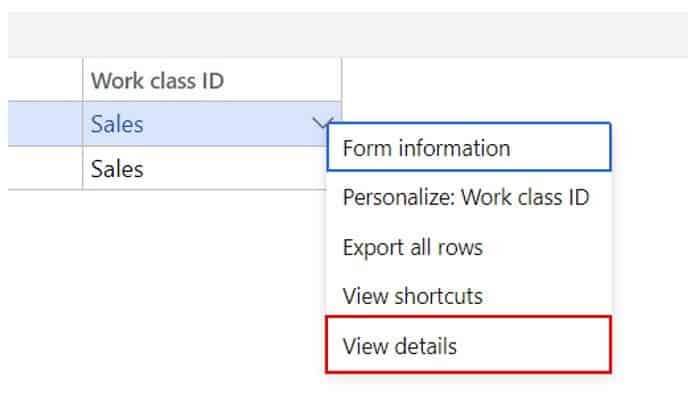
If you do not see a work class in the drop down, you will need to create one. To do this right click on the drop-down arrow for “Work class” and click “View details”. This will take you to the work class form. Click the “New” button and enter a work class ID, give it a description, and in the “Work order type” field select “Sales order”.

- Next navigate back to the work template and select the work class you just created.
- Click the “New” button again to create the second line and select “Put” as the “Work type”. Select the “Work class” and click the “Save” button.
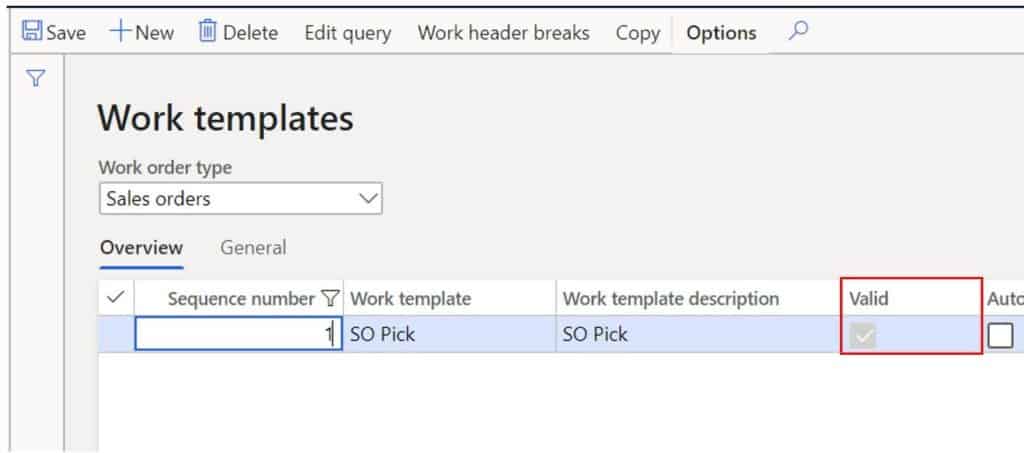
- You will now notice that the warning message has gone away and the “Valid” checkbox is now checked. This means that we have a valid template.
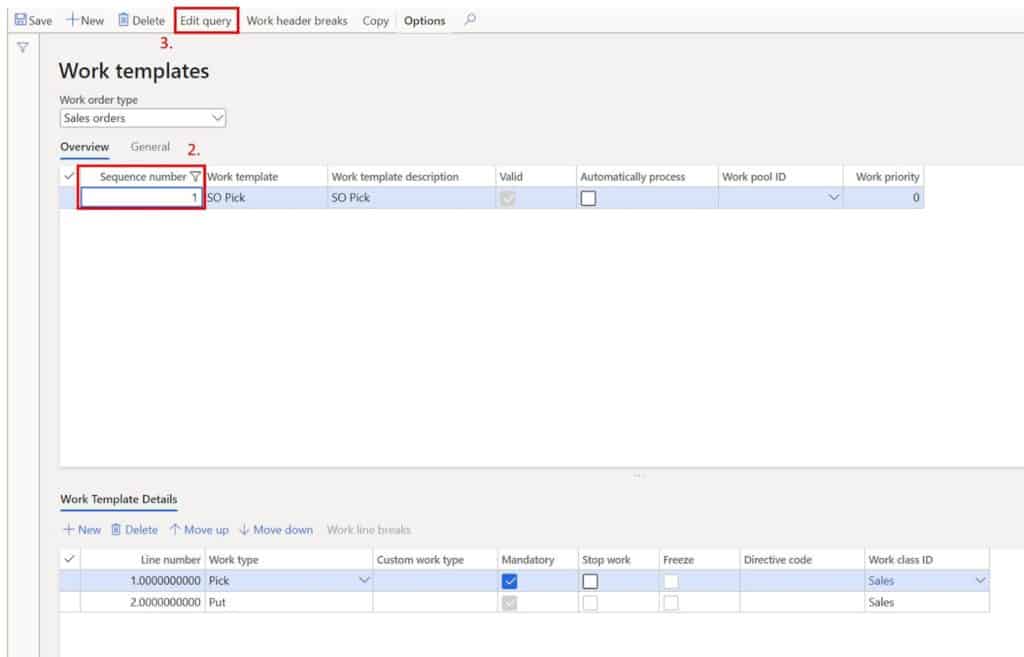
Work Template Explained
In this section I am going to go through the entire form and explain the purpose or function of each field or button. Let’s start from the top.
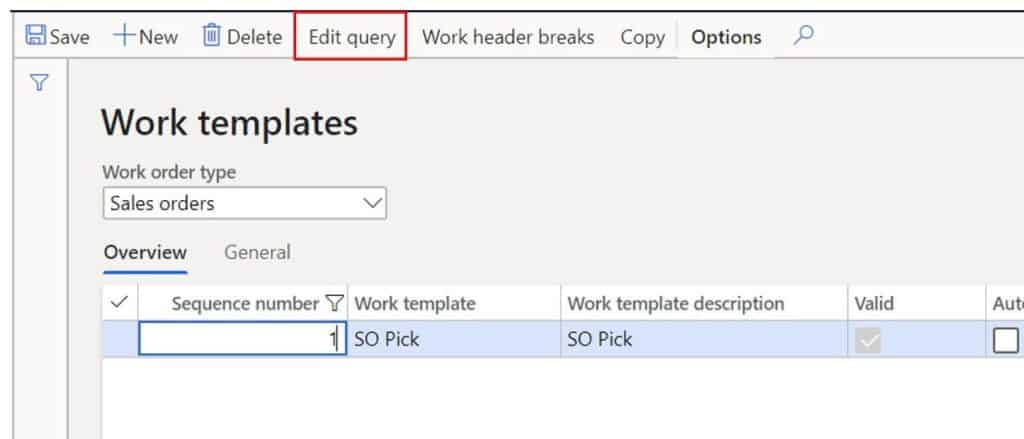
The first button we see if the “Edit query” button. This button allows you to configure a query related to the work template. This requires a little explanation. You could have multiple work templates.
For example. Maybe you have one sales picking process where you pick something and then you stage it somewhere where value added services are performed or some sort of palletization occurs and other cases where there is no staging step and the products are picked and put to the outbound dock for shipping. The query allows you to filter down to the specific work template you want the system to select when your query parameters are met.
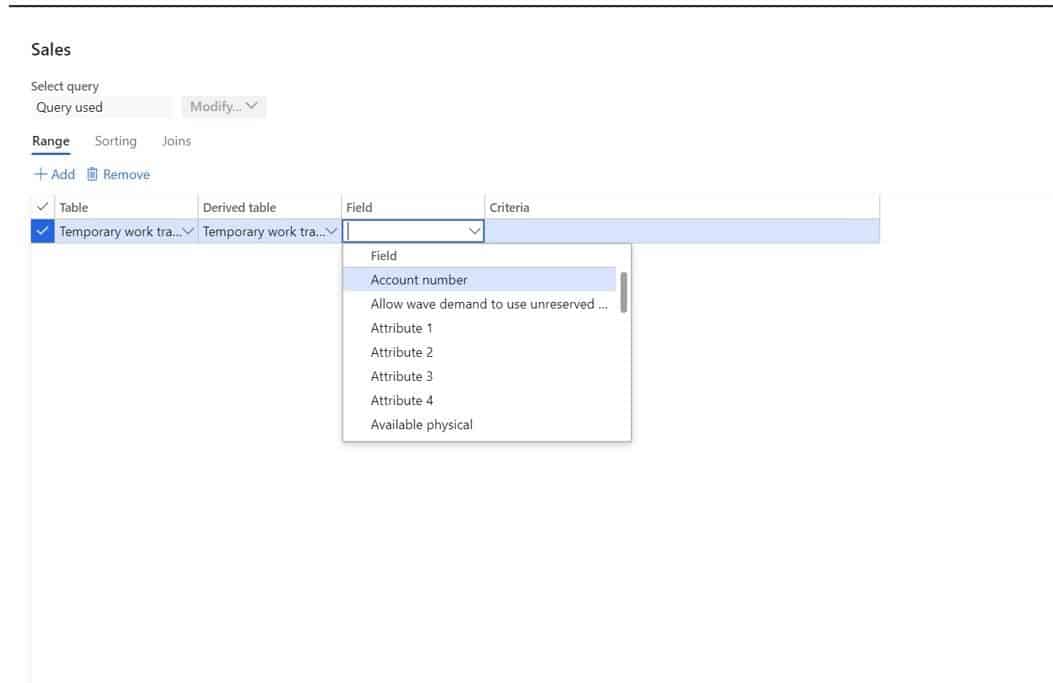
The default table you are able to select from is the “Temporary work transactions” table which contains several fields from the source of the work creation. In the case of sales order picking this will be fields coming from the sales order, shipment, or load associated with the order.
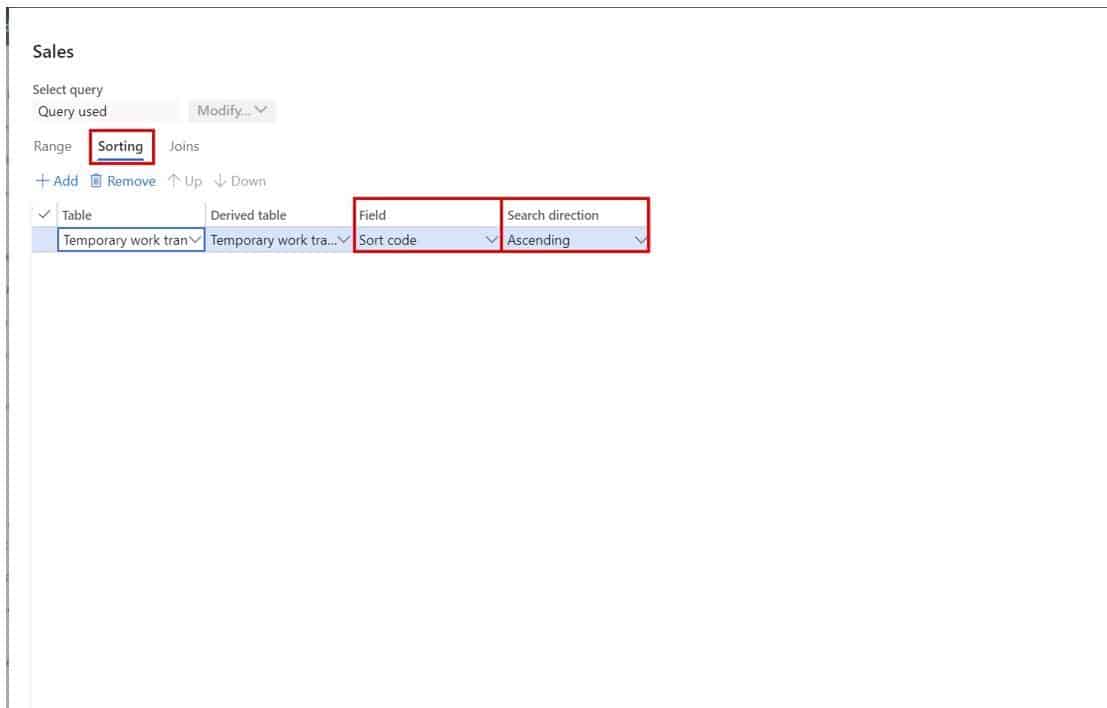
On the query form you can also define how you want the work to be sorted. In the example I have selected sort codes. Sort codes are an integer value specified on the location record. In the example when work is created it will sort the picking work in order based on the sort code. This helps you establish a picking route.
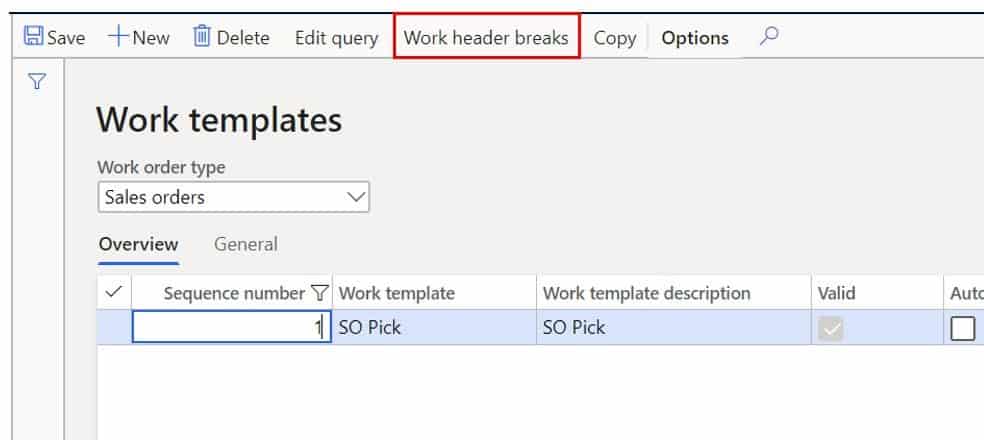
The next button is the “Work header breaks” button. You will notice that this field is only enabled when you select a sorting field as shown previously.
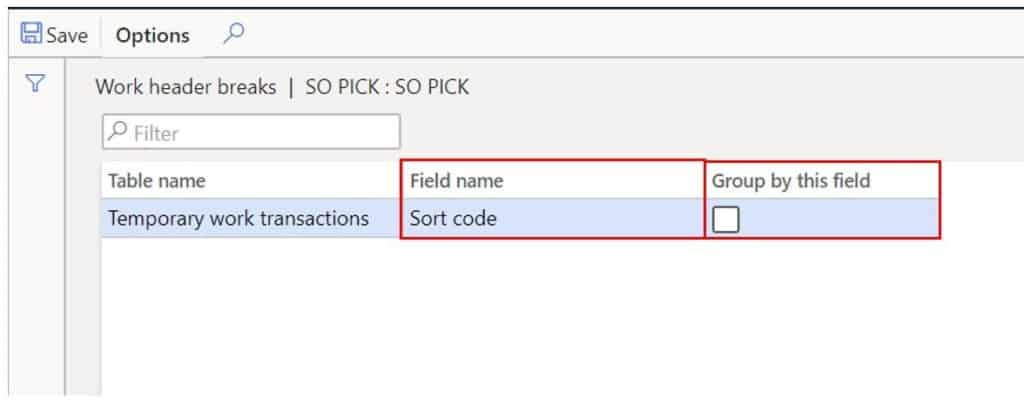
In the “Work header breaks” form you see the sort code field that we selected to sort our work by. The “Group by this field” field if selected will split the work out (group) it by the sort code. What this means is that if my picking work told be to pick from multiple locations if the “Group by this field” field was selected I would get a separate work header record created for each unique location sort code.
If it is disabled it will simply sort the pick and put records according to sort code, and not group the work in any particular way. Work header records are what show up on the warehouse mobile application for users to complete.
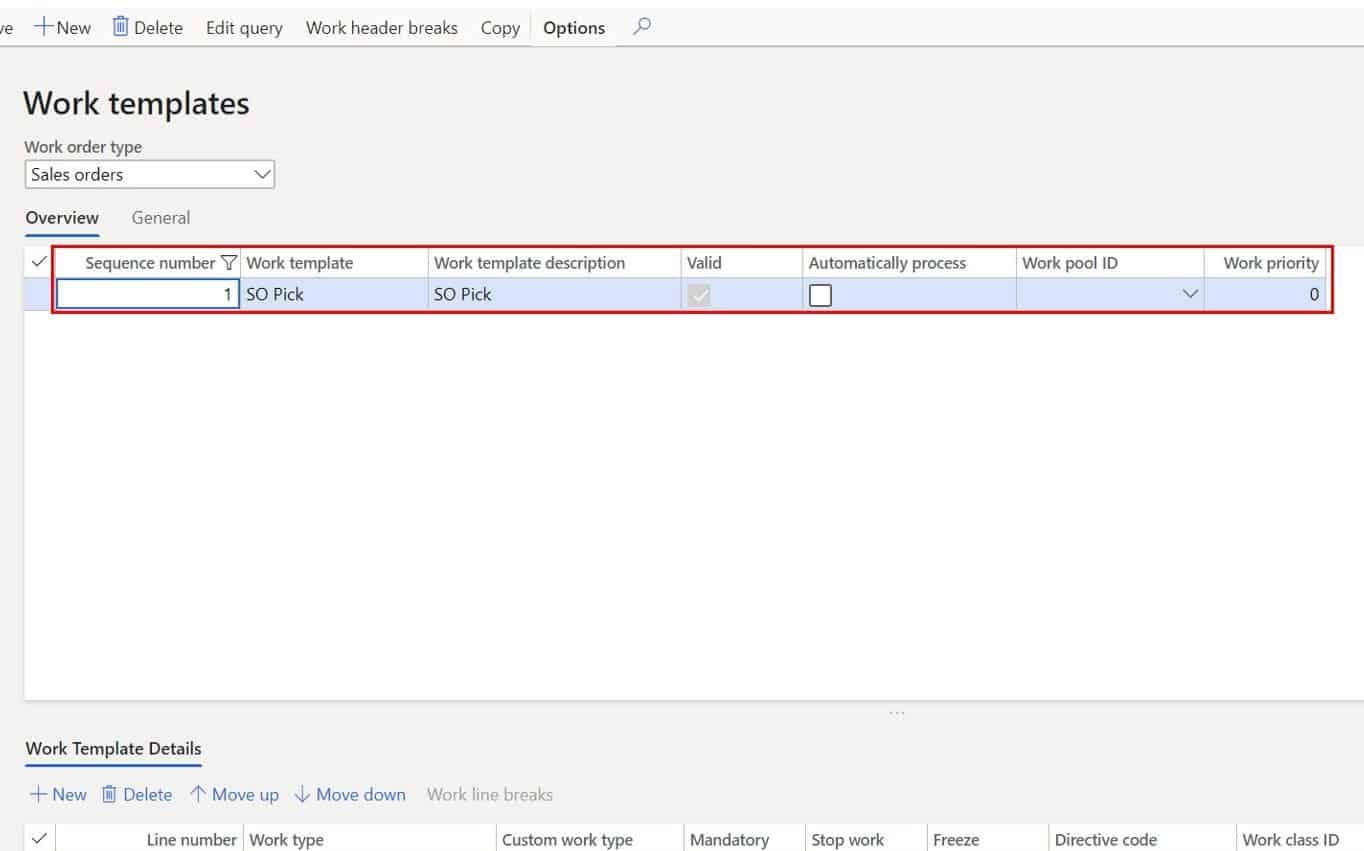
In the “Overview” pane the first record in the “Sequence number” record. The sequence number record is the sequence the system will look, along with any query you have specified, to try to find the correct work template to use when creating warehouse work. Later in the article you will see a visual diagram showing you the logic behind work creation.
Next is “Work template”. This is just the unique identifier of the work template header record.
“Work template description” is exactly what is sounds like.
“Valid” indicates if the work template is valid or not. This field is not editable and is controlled by the system checking to see if the work template meets work template setup requirements (typically but not limited to, pick put pairs and the order of the pick put pairs).
“Automatically process” allows you to automatically process the work upon wave release.
The “Work pool ID” allows you to tag work that gets created from the template with a pool ID which you can then use to filter and search for to manage and keep track of work. It can also be used to group work on the mobile application menu item.
“Work priority” allows you to set a default priority rating to work that gets created from this work template. So, if you are using the system directed picking functionality on your mobile device, which essentially is a first come first serve way to allocate work to different warehouse mobile application users, you can configure your mobile device menu items to sort work based on priority.
This will ensure that the system dolls out higher priority work over lower priority work. This is great in cases where you have high priority or rush orders, or specialized production orders that require a higher priority than other warehouse processes.
In the lower pane the first field is the “Line number” field. This field is really just to indicate the line number and sequence of steps to be performed in the work template.
The “Work type” field indicates what type of work the process step will be for. The most common choices by far are “Pick” and “Put”. I do not have time in this article to go into each option so that will have to wait for another article.
“Custom work type” custom work type allows you to create your own work type and perform it on the warehouse mobile app. The custom work type is tied to a custom build method call that is integrated with the warehouse mobile application framework. An example of a custom work type could be something that triggers a document or label to be printed.
“Mandatory” indicates if the work step is mandatory.
“Stop work” stop work is used to indicate a break in the work. For example if you had a two step sales picking process where you pick and put to a staging location and then someone else picks it up from the staging location and puts it to the packing station or the shipping dock, you could create a multi-step work template and use the stop work to indicate the first half of the work process and where the second half begins.
“Freeze” means the that specific step will be frozen and need to be released or unblock for the work to be completed.
“Directive code” is a way you can link particular work template lines to location directives. This will make more sense after you finish the location directive section.
“Work class” as discussed earlier is the link between a particular warehouse mobile application menu item and the work that is generated from this work template.
Location Directives
Now that we have seen how work templates work and are set up you can start to see that we are telling the system that we want to pick and put somewhere but we have not yet defined where. The location directives are a sophisticated and very flexible way Dynamics 365 Finance and Operations offers for us to do this.
We will start by creating the location directive records that we need and then I will go through the entire form and explain the function or purpose of each button and field.
Create A Location Directive
To create a location directive, navigate to Warehouse management > Setup > Location directives.
- Click the “New” button.
- Enter a “Location directive name”.
- Select a “Work type”. In this case our first record will be a “Pick” record and the second will be a “Put” record.
- Select the “Site” and “Warehouse” where the location directive should be considered.
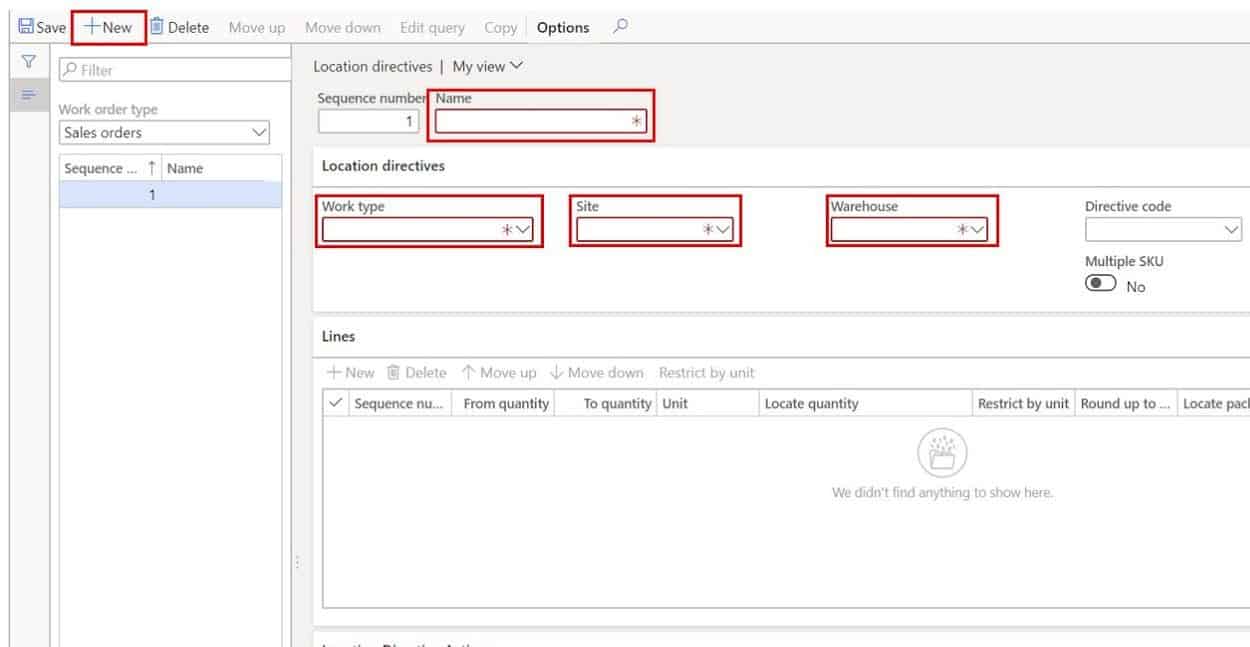
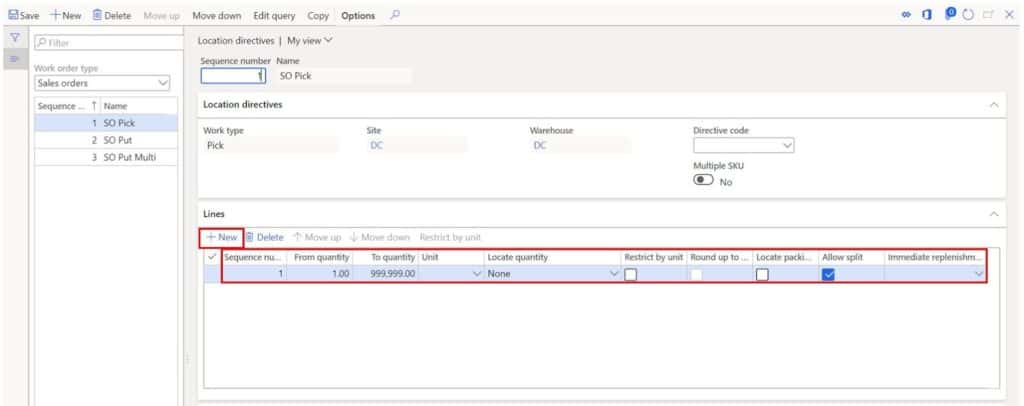
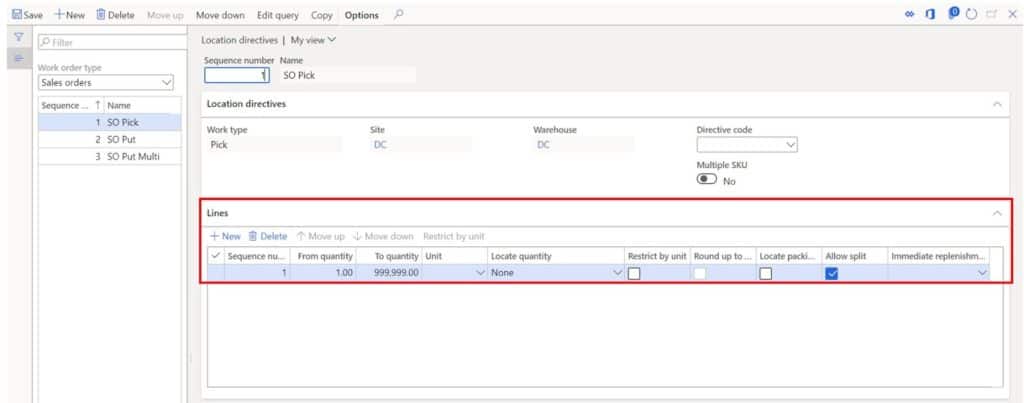
- Next, in the “Lines” section click the “New” button.
- Enter the “From” and “To” quantity. This is the quantity that will come from the source order, this case the sales order. Think of this as a filter criterion. So, if you put 1 to 10 for line 1 and 11 to 20 for line 2 and your sales order item quantity on the sales order is 15 the second line will be selected.
- In the “Allow split” option select if you want to allow the reservation required to fulfill the sales order to be done over multiple locations.
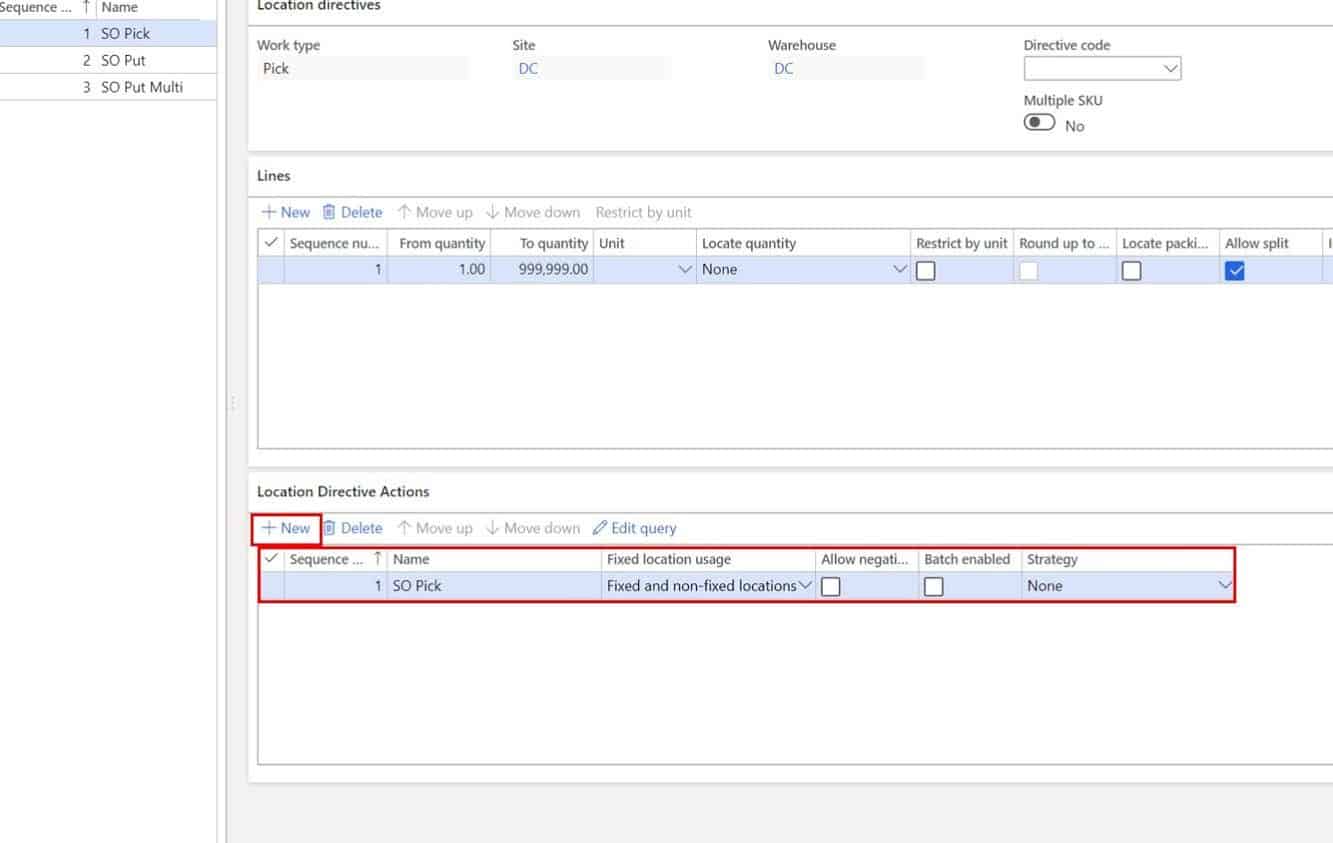
- In the “Location directives actions” section click the “New” button and give the action a “Name”.
- Select a “Fixed location usage”. We will discuss later what this means.
- Select the “Batch enabled” field if the location directive action is applicable to batch enabled items. Note: if you have some items that are batch enabled and some that are not you will need to create two location directive actions, one batch enabled and one batch disabled.
- Select the “Strategy” if applicable. The relevant strategy will be dependent on whether you are doing a pick or a put operation.
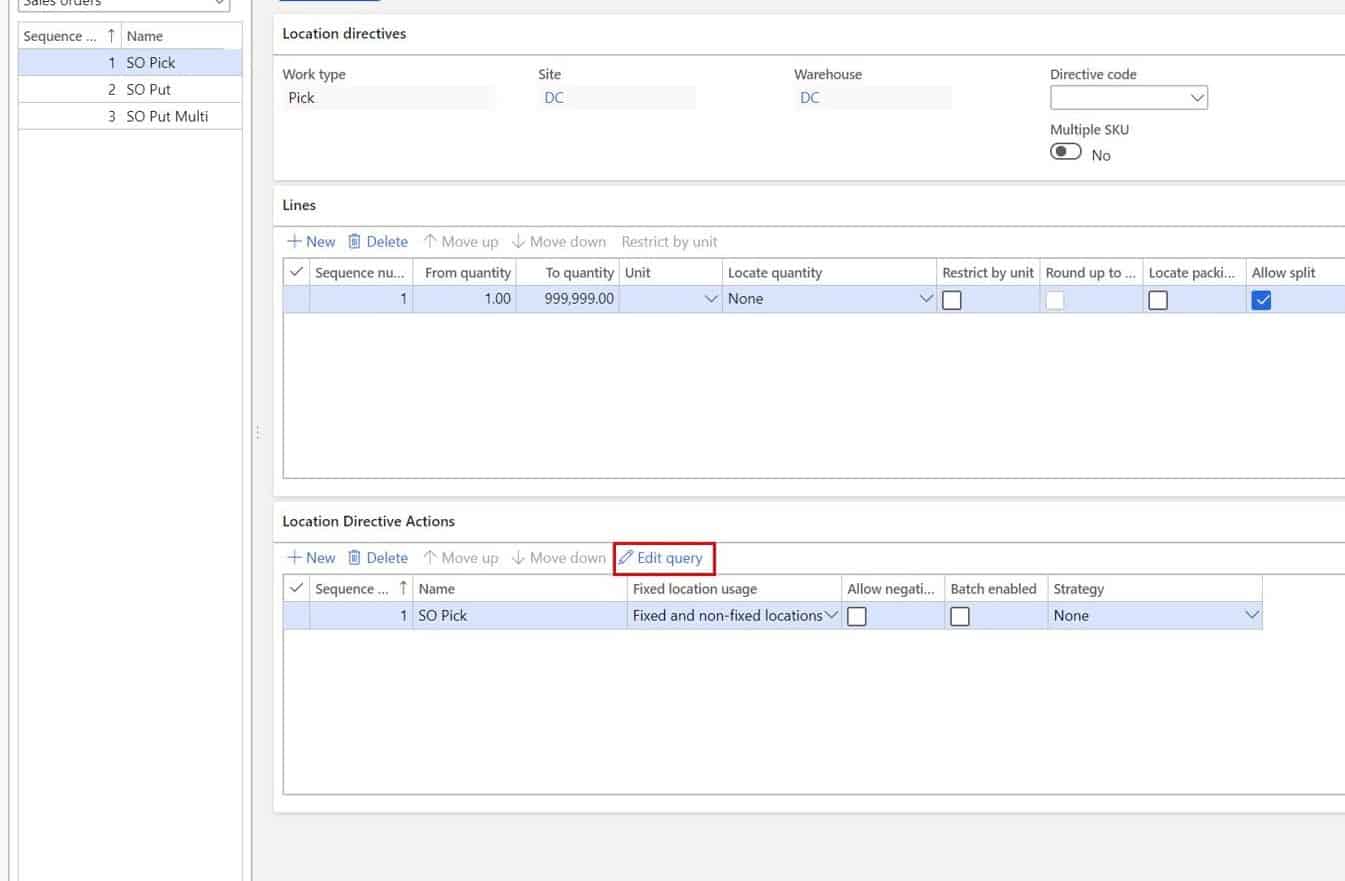
Next, click the “Edit query” button. In the query you can define in the case of a pick where you want to limit your picking from. In the case of a put you will be defining the location(s) that will constitute a valid put location.
You will need to repeat the process to create a put record this time changing the “Work type” to “Put” and in the location directive action query defining your location selection for where you want to put the picked items.
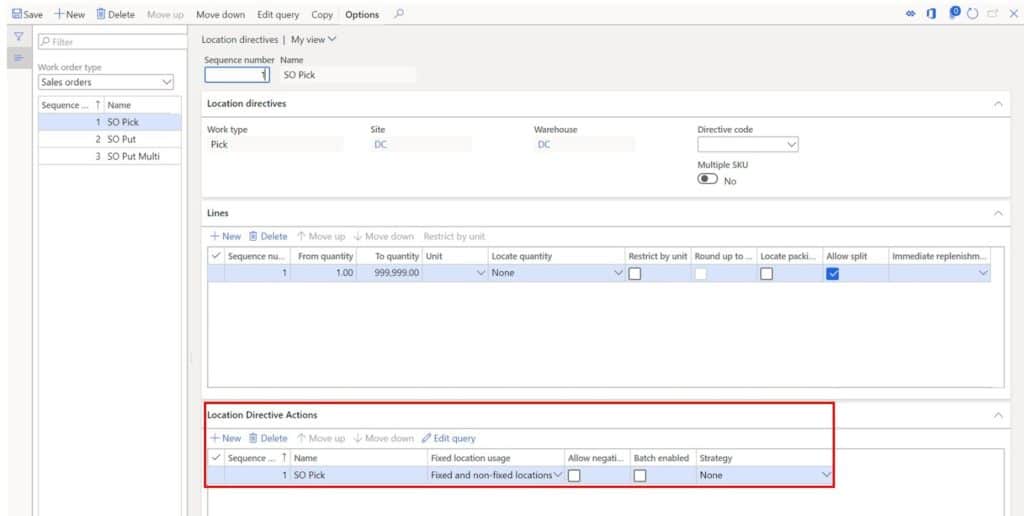
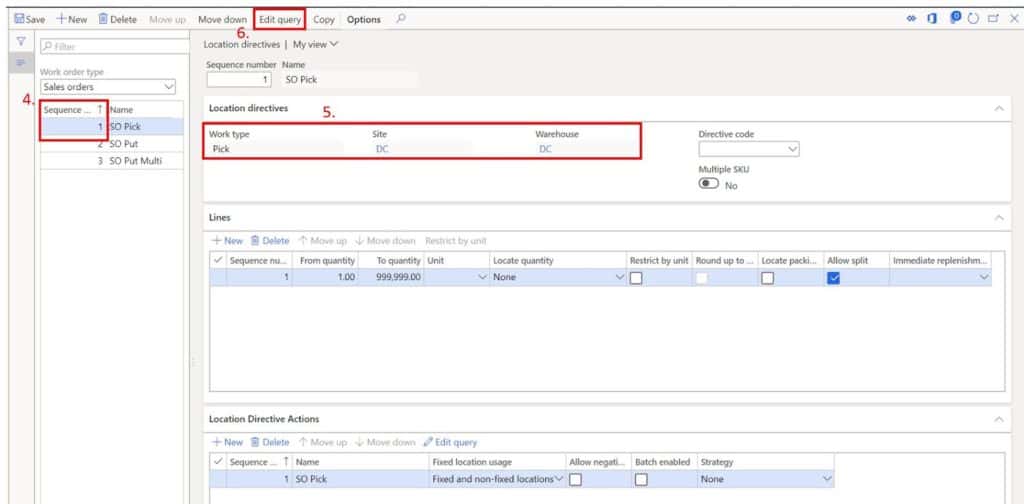
Location Directives Explained
- Now that we the location directives created, I’ll walk through the entire form, top to bottom, and explain each button and field.
- The first button on the form is the “Move up” button this button allows you to move the sequence of the location directive up without having to manually renumber the sequence of the other records.
- Similarly, the “Move down” button allows you to move down without having to manually renumber the location directive sequence numbers.
- The “Edit query” button is another query dialog where you can specify a query for the entire location directive record. Continuing with the sales order example, let’s say I wanted to select a specific location directive for a customer to perform specific pick and put operations that are distinct from all other order picking from other customers. I could set a filter for that customer in the query and move it above location directives that do not have filters (remember sequence takes priority). Then when work gets generated for that customer it will pick the exact location directives, I want it to.
- The “Copy” option allows you to copy the location directive, even any queries that might be associated, and rename a new location directive. This is really helpful if you are creating multiple location directives that maybe have similar structure or queries.
- The “Work order type” field indicates the location directive for the associated work type. In this case the work type is “Sales order”.
- The “Sequence number” is the sequence in which the location directives will be surveyed for the location directive to be used to create the work. This will make more sense in the next section.
- The location directive “Name” field is a unique identifier for the location directive. Note: The name cannot be changed once saved so you may want to make the name more generic.
- “Work type” specifies whether the location directive will apply to a “Pick” or “Put” work step.
- The “Site” and “Warehouse” fields are further filter the location directive by the site and warehouse of the source order. In the example if I released a sales order from a warehouse other than “DC” none of the location directives would be selected.
- The “Directive code” is a way you can link a specific “Put” location directive with a work template line. This is especially useful when you have a multi-step work template. Directive codes can also be used to link a movement by template menu item to a specific location directive.
- “Multiple SKU” is used on “Put” location directives where you want to put away multiple items. For example, if you are doing sales order picking you may want to Pick items A, B, and C from locations 1, 2, and 3 and drop them all off at the outbound dock.

- In the “Lines” section I think you get the idea with the “Move up” and “Move down” buttons.
- The “Restrict by unit” button is only enabled when the “Restrict by unit” check box is selected. The “Restrict by unit” feature works along with the unit sequence group functionality to use quantities to determine the handling unit which should be used for the respective location directive line. If that didn’t make sense let me give you an example. Let’s say you treat pallets during the picking process differently than picking cases. You can use the “Restrict by unit” feature to take the picking quantity and determine how much of that is in units of pallets and units of cases and select different location actions accordingly.
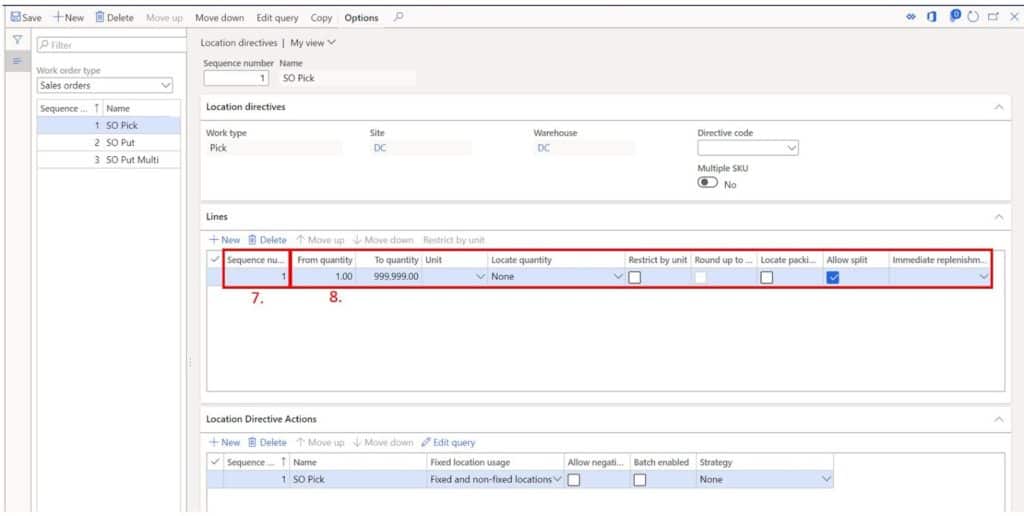
- I think you get the idea behind “Sequence number” by now.
- The “From quantity” and “To quantity”, as I mentioned above, is really just a filter criterion that can be used to select a certain location directive line based on the released quantity.
- The “Unit” field is also more of a filter field. This field is often confused with the “Restrict by unit” field. For example, if I released an order with a unit of measure “EA” and my first location directive line “Unit” was “PL” (pallet) it would skip my first line and look for a line with a blank “Unit” field or one with “EA”.
- The “Locate quantity” field is a modifier for the “Unit” field.
- The “Round up to unit” field option is used to indicate if the raw material picking should be rounded up to a multiple of the handling unit specified in the “Restrict by unit” selection. However, this only applies to raw material picking.
- When “Locate packing quantity” is enabled only the locations with this packing unit quantity are selected.
- In the case of sales order picking the “Allow split” option lets you spread the reservation across multiple locations. On “Put” location directives it allows you to put away to multiple locations.
- The “Immediate replenishment template” lets you tie the location directive line to a replenishment template and if the line cannot be allocated, the replenishment will occur immediately instead of after all lines of the location directive have been processed.
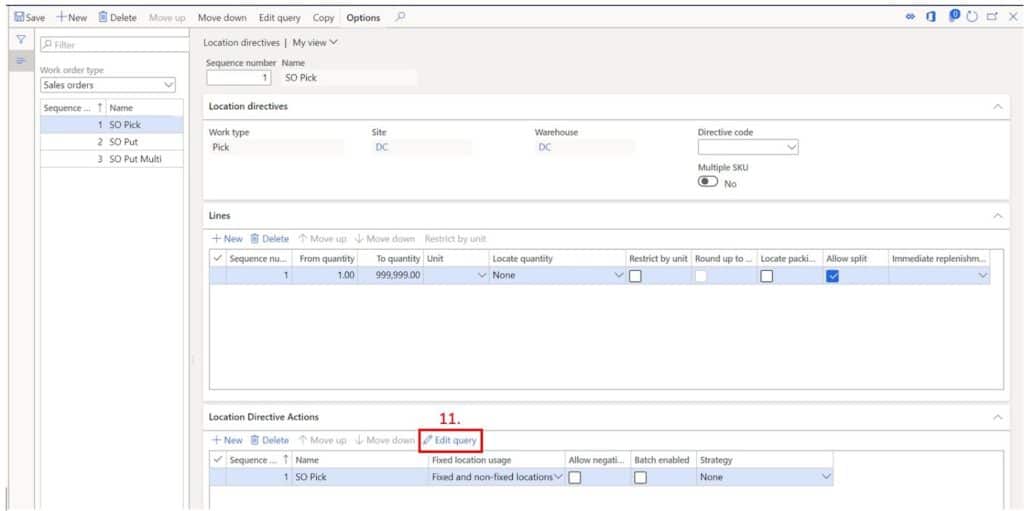
- In the “Location directives actions” section the “Edit query” button defines the location being picked from on a “Pick” location directive and the location being put to on a “Put” location type.
- “Sequence number” … same story.
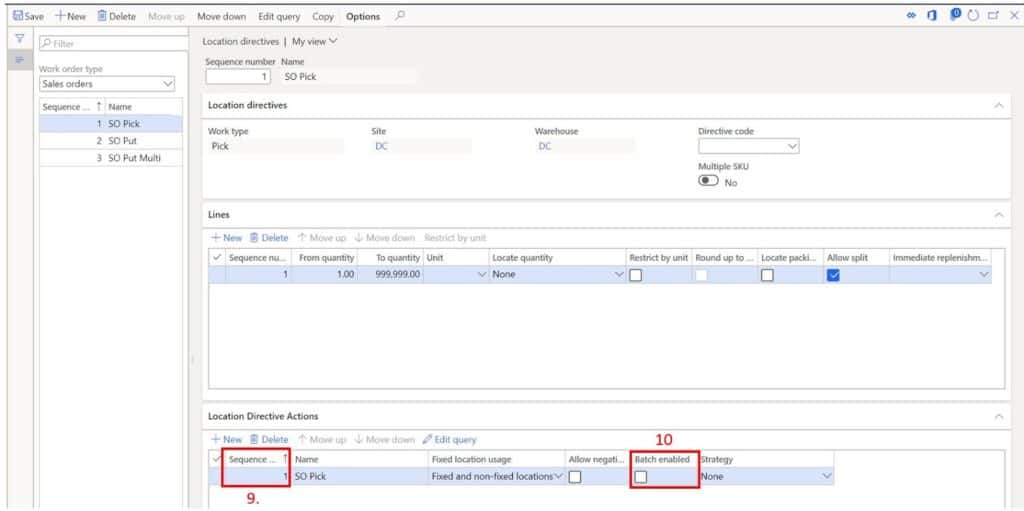
- The “Name” field is the name that identifies the location directive action. Note: this name cannot be changed unless you delete the record.
- “Fixed location usage” is where you can define if the location should be fixed, non-fixed, or only fixed locations. Fixed locations are when you have a fixed location for specific items. Fixed locations are a separate setup.
- “Allow negative inventory” to be honest I have never seen this used and would not recommend using negative inventory with advanced warehouse management.
- The “Batch enabled” flag indicates whether the line is used for batch enabled items.
- The “Strategy” used is dependent on several things including if the location directive is a “Pick” or a “Put”. Below is an explanation of the strategies:
- Match packing quantity – determines if the pick location has the specified packing quantity.
- Consolidate – consolidates items in a location where the item exists on-hand.
- FEFO batch reservation – reserves and allocates inventory based on first expiry first out principle according to the batch expiration date.
- Round up to full LP – is used to round up the inventory quantity to match the license plate (LP) quantity that is assigned to the items to be picked. This strategy is only be used for replenishment.
- Empty location with no incoming work – used to locate empty locations. The location is considered empty if it has no physical inventory and no expected incoming work.
How Work Gets Created
This part was such an enigma to me when I first started learning advanced warehousing (WMS) for Dynamics 365 Finance and Operations. I knew that work templates and location directives were intimately linked but I really didn’t understand how it all fit together and the way the system looked at the configuration to determine the work that was created.
In this section I am going to break down the logic that the system goes through step by step. I think this will help you put the pieces together on how the work template and the location directive work together. Keep in mind, in reality there is much more logic and code being executing behind the scenes, but the intent of this section is to walk through the basic work creation process in plain English, without getting into all the various nuances and caveats of all the possible ways you could set location directive and work templates up.
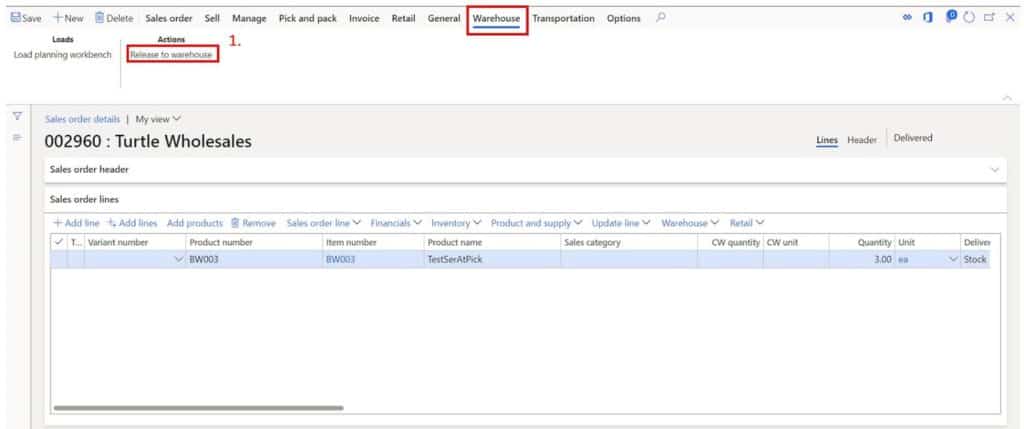
The trigger that starts the work creation process is different depending on the source order that you are talking about. For example:
- Sales orders – Release to warehouse either by batch job or directly from a sales order.
- Purchase order – Purchase registration.
- Raw materials picking – Release to warehouse by batch job or directly from a production order.
- Finished goods put away – Report as finished.
- Co-product and by product put away – Report as finished.
- Transfer issue – Release to warehouse by batch or directly from a transfer order.
- Transfer receipt – Transfer registration.
- Inventory movement – Movement by template with create work enabled. Create inventory movement work from the location.
- Cycle counting – Cycle count plan, short pick, cycle count threshold, and manually created cycle count work.
- Replenishment – Wave replenishment where a source order (like a sales order or production order) does not have enough stock. This is initially triggered by the source orders trigger mechanism mentioned above.
- Return orders – Return registration.
To keep it simple let’s, stick with our example of a sales order and walk through the logic.
1. On a sales order in the “Warehouse” tab there is a “Release to warehouse” button. When you click this, it will trigger the creation of work. There are some caveats to take into consideration like, is there enough inventory, is it reserved, and is the inventory available from a valid picking location dictated by the location directive. Let’s leave that aside for now and continue with the logic.
2. The next thing the system will do is find the applicable work template. The first thing it looks at is the “Sequence number” so it starts at the top and works its way down in sequence.
3. Then it checks to see if the query associated with the work template matches. The first match it finds it will use.
Now that it has the template with one pick, and one put. It needs to assign a location to pick from and a location to put to.
4. The system will go to the location directives form and in similar fashion it will start with the sequence number lowest to highest and work its way down.
5. The first record it looks for is a location directive of type “Pick” where the “Site” and “Warehouse” match with the sales order.
6. If there is a query it will also try to find a match given the query associated with the location directive record.
7. When it finds a match, it moves to the “Lines” section of the location directive where it starts with the “Sequence number” and moves from highest to lowest.
8. It tries to find a match using sections you have made on the lines record. For instance, if you have a from and to quantity if the source order quantity falls into that quantity, and if you have specified a unit of measure it also tries to match that. If you have enabled restrict by unit it will see if it can create work for that unit given the order quantity and the unit conversion.
Once it finds a match the lines level it moves to the “Location directives actions” section and begins to evaluate the location directive actions associated to the chosen location directive line (remember there could be multiple location directive lines and each line could have multiple location directive actions).
9. Again, the system will start with the first location directive action in sequence and work its way down until it finds a match.
10. The system starts by checking to see if the item being released for picking is batch enabled. If it is, it will skip any location directive action where batch enabled is false.
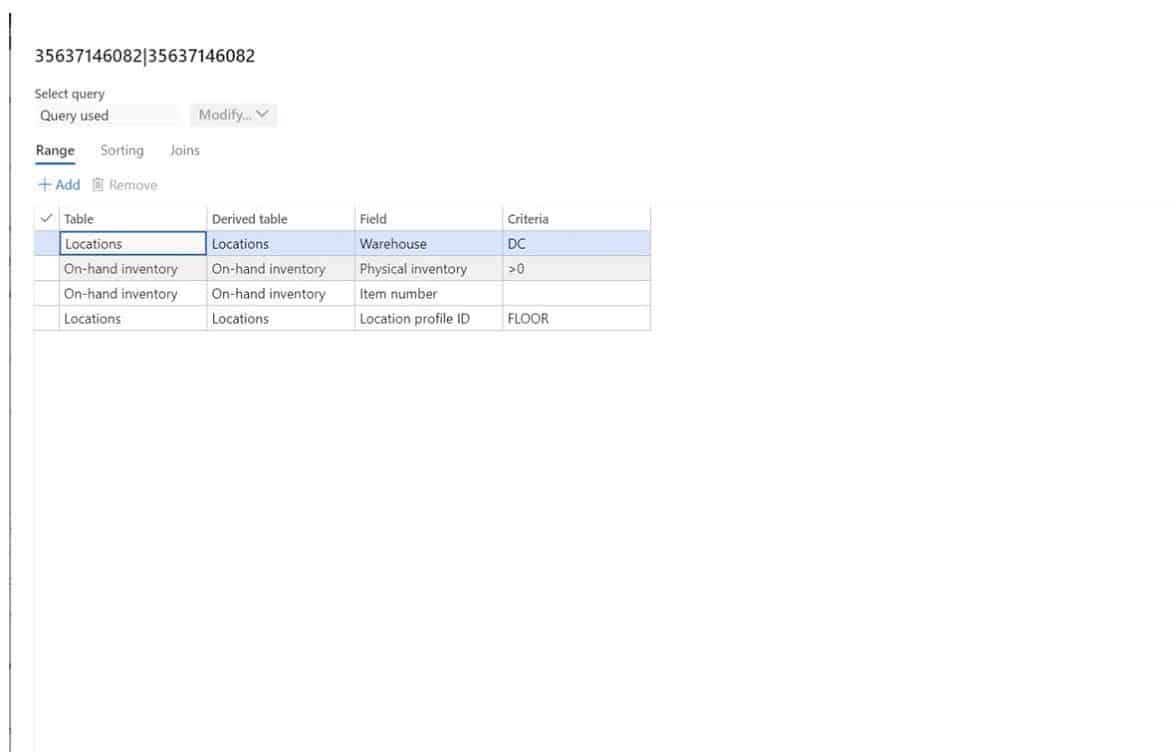
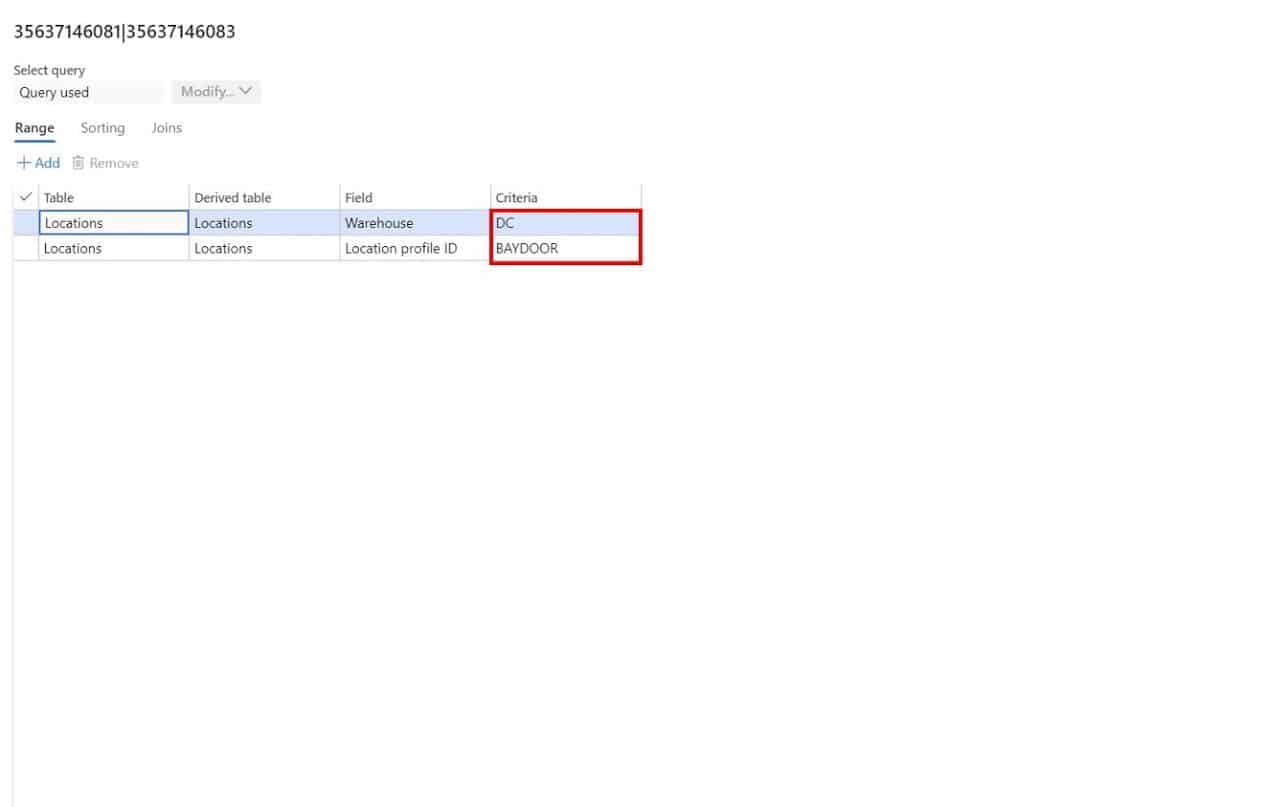
11. Then it looks at the query associated to the location directive action. For example, in this query the system is looking to pick from the “DC” warehouse, where physical inventory is greater than zero, and find a location that has a location profile of “FLOOR”.
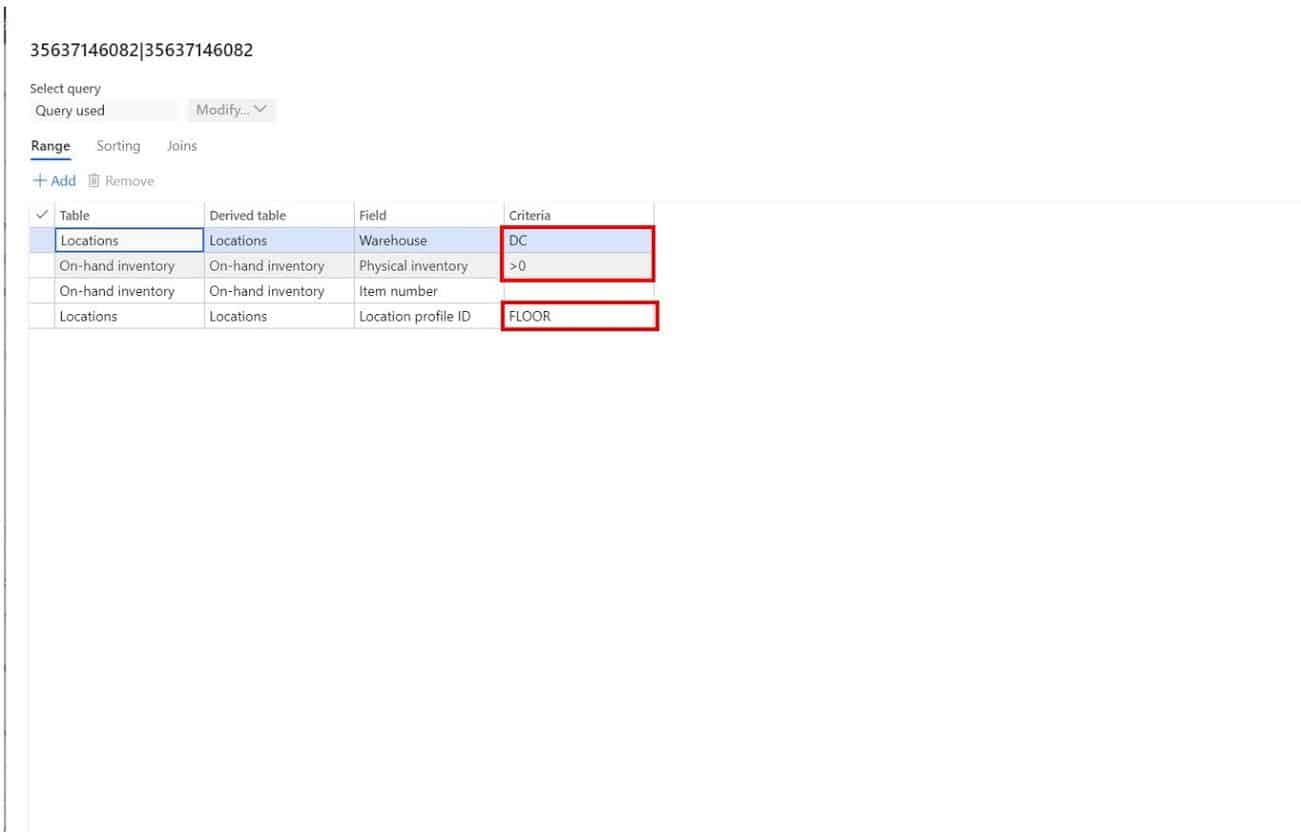
The system will loop through each applicable location directive action until it finds an action where it can fully allocate the quantity of the order and it uses that location it finds as the pick from location on the work that gets generated.
Then the system tries to figure out the put location. It goes through very similar logic and when it gets to the location directive action it will look at the query to figure out the put location. In this case it is looking for the first location it finds with “BAYDOOR” location profile.
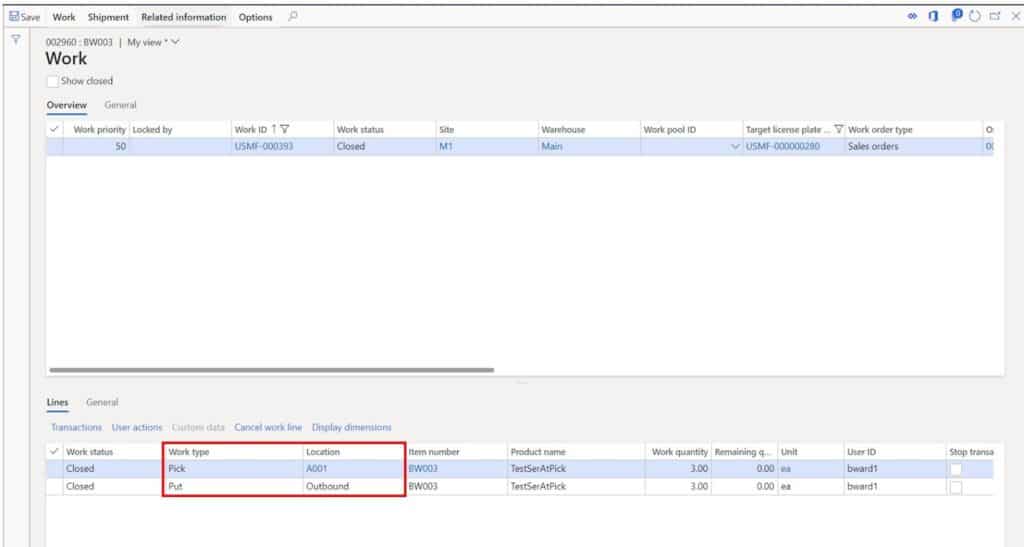
The result is sales picking work shown below. “A001” was the first location found where the location profile was “FLOOR” and there was sufficient inventory. “Outbound” was the first location found where the location profile was “BAYDOOR”.
Takeaways
I hope this article has helped to shed some light on one of the most complex processes and setups in Dynamics 365 Finance and Operations. The example use in this article was a simple one and was intended to illustrate the basic mechanics of work templates and location directives. Keep in mind there are many configuration factors that could affect the work that results from the work creation process.